
LVM commands to create, extend & delete partition
What is the Meaning of LVM?
LVM stands for logical volume manager aka logical volume management. In simple words, it’s a management solution to manage your disk smartly. With LVM partition you can any time create, extend, shrink, resize, or delete a volume without hampering your ongoing work.
You can also add another SSD or HDD and grow your LVM volume easily.
The process to create LVM volume begins with attaching SSD/HDD to your system.
Create Physical Volume
Physical Volumes (PV) are the base of the LVM structure. It can be a partition on the disk or the whole disk itself. The first step would be to identify the disk attached. Run the following command to get the list of disks.
[root@mail ~]# lsblk
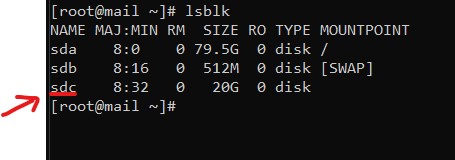
As can be seen in the above picture sdc is a newly attached disk.
Now to create physical volume execute the following command.
[root@mail ~]# pvcreate /dev/sdc
You should get output like Physical volume "/dev/sdc" successfully created.
If you have more than one disk you can run the command like below to create PV
[root@mail ~]# pvcreate /dev/sdc /dev/sdd
You can also get information about created/existing physical volume by
[root@mail ~]# pvscan
  PV /dev/sdc                      lvm2 [20.00 GiB]
  Total: 1 [20.00 GiB] / in use: 0 [0   ] / in no VG: 1 [20.00 GiB]
If you need more information like size, or free space you can simply execute the following command
[root@mail ~]# pvdisplay /dev/sdc
  "/dev/sdc" is a new physical volume of "20.00 GiB"
  --- NEW Physical volume ---
  PV Name               /dev/sdc
  VG Name
  PV Size               20.00 GiB
  Allocatable           NO
  PE Size               0
  Total PE              0
  Free PE               0
  Allocated PE          0
  PV UUID               bBTp1Z-YxGT-6JSw-Gihv-DYpg-mCRv-RoCx9f
You can further use pvdisplay to display all the volumes.
Create Volume Group
The next step is to create a volume group. Imagine you have created a bunch of physical volumes from partition/bare disk. Now you want to use all of them like one disk. Voila! Volume Group is the answer to your problem. VG is nothing but a bunch of physical volumes clubbed together.
This also means you can attach a partition later to the system, create PV and add to the volume group. Simple isn’t it?
Let’s create a VG with only one PV at present.
[root@mail ~]# vgcreate vg1 /dev/sdc
  Volume group "vg1" successfully created
If you want to view detailed information about specific VG
[root@mail ~]# vgdisplay -v vg1
  --- Volume group ---
  VG Name               vg1
  System ID
  Format                lvm2
  Metadata Areas        1
  Metadata Sequence No  1
  VG Access             read/write
  VG Status             resizable
  MAX LV                0
  Cur LV                0
  Open LV               0
  Max PV                0
  Cur PV                1
  Act PV                1
  VG Size               <20.00 GiB
  PE Size               4.00 MiB
  Total PE              5119
  Alloc PE / Size       0 / 0
  Free  PE / Size       5119 / <20.00 GiB
  VG UUID               MXwoM2-eifP-UXG1-blcs-854T-Ih3i-aHinwB

  --- Physical volumes ---
  PV Name               /dev/sdc
  PV UUID               bBTp1Z-YxGT-6JSw-Gihv-DYpg-mCRv-RoCx9f
  PV Status             allocatable
  Total PE / Free PE    5119 / 5119
If you want to view information of all VG, vgdisplay is the command.
Create Logical Volume
After creating VG, it’s time to create Logical Volume (LV). You can create multiple LV inside VG. Or, you can simply create one LV to occupy all space of VG.
Let’s say you want to carve 10GB out of 20GB. Then use the following command.
[root@mail ~]# lvcreate -L 10g -n lv1 vg1
  Logical volume "lv1" created.
L: To Specify Volume Size
n: To Logical Volume Name
If you want to use 100% of the free space in VG to create a logical volume, use the following command
[root@mail ~]# lvcreate -l 100%FREE -n lv2 vg1
  Logical volume "lv2" created.
Now to view the logical volumes created
[root@mail ~]# lvdisplay
  --- Logical volume ---
  LV Path                /dev/vg1/lv1
  LV Name                lv1
  VG Name                vg1
  LV UUID                0UcqUR-EotB-t3Eh-5w3V-rtA4-SALb-uffk0P
  LV Write Access        read/write
  LV Creation host, time mail.onedashline.com, 2022-06-05 10:30:48 +0000
  LV Status              available
  # open                 0
  LV Size                10.00 GiB
  Current LE             2560
  Segments               1
  Allocation             inherit
  Read ahead sectors     auto
  - currently set to     8192
  Block device           253:0

  --- Logical volume ---
  LV Path                /dev/vg1/lv2
  LV Name                lv2
  VG Name                vg1
  LV UUID                MzAnEW-eaqW-q4Y0-0De2-uUq5-Cn9H-Txth1B
  LV Write Access        read/write
  LV Creation host, time mail.onedashline.com, 2022-06-05 10:52:15 +0000
  LV Status              available
  # open                 0
  LV Size                <10.00 GiB
  Current LE             2559
  Segments               1
  Allocation             inherit
  Read ahead sectors     auto
  - currently set to     8192
  Block device           253:1
If you want to view detail of just one logical volume
[root@mail ~]# lvdisplay -v /dev/vg1/lv1
  --- Logical volume ---
  LV Path                /dev/vg1/lv1
  LV Name                lv1
  VG Name                vg1
  LV UUID                0UcqUR-EotB-t3Eh-5w3V-rtA4-SALb-uffk0P
  LV Write Access        read/write
  LV Creation host, time mail.onedashline.com, 2022-06-05 10:30:48 +0000
  LV Status              available
  # open                 0
  LV Size                10.00 GiB
  Current LE             2560
  Segments               1
  Allocation             inherit
  Read ahead sectors     auto
  - currently set to     8192
  Block device           253:0
Create Filesystem
Now logical volume is ready, create filesystem
[root@mail ~]# mkfs.ext4 /dev/vg1/lv1
mke2fs 1.42.9 (28-Dec-2013)
Discarding device blocks: done
Filesystem label=
OS type: Linux
Block size=4096 (log=2)
Fragment size=4096 (log=2)
Stride=0 blocks, Stripe width=0 blocks
655360 inodes, 2621440 blocks
131072 blocks (5.00%) reserved for the super user
First data block=0
Maximum filesystem blocks=2151677952
80 block groups
32768 blocks per group, 32768 fragments per group
8192 inodes per group
Superblock backups stored on blocks:
        32768, 98304, 163840, 229376, 294912, 819200, 884736, 1605632

Allocating group tables: done
Writing inode tables: done
Creating journal (32768 blocks): done
Writing superblocks and filesystem accounting information: done
Mount Filesystem
Now you can mount the filesystem and make use of it.
[root@mail ~]# mkdir /newspace
Now to mount simply
[root@mail ~]# mount /dev/vg1/lv1 /newspace
If you want to make this mount permanent, which most of all will do, find UUID with the following command
[root@mail ~]# blkid /dev/vg1/lv1
/dev/vg1/lv1: UUID="f13b083c-3b85-4ab5-8903-e60a0584dfda" TYPE="ext4"
After that edit /etc/fstab and make entries to it.
UUID=f13b083c-3b85-4ab5-8903-e60a0584dfda /newspace ext4 defaults 0 0
Extend LVM
Extending LVM is one of the biggest reasons for its popularity. You can extend it in a few commands without any downtime. Let’s see how it can be done!!
First, create a physical volume and of course, you can check for disk by lsblk
[root@mail ~]# lsblk
NAME      MAJ:MIN RM  SIZE RO TYPE MOUNTPOINT
sda         8:0    0 79.5G  0 disk /
sdb         8:16   0  512M  0 disk [SWAP]
sdc         8:32   0   20G  0 disk
├─vg1-lv1 253:0    0   10G  0 lvm  /newspace
└─vg1-lv2 253:1    0   10G  0 lvm
sdd         8:48   0   20G  0 disk
[root@mail ~]# pvcreate /dev/sdd
  Physical volume "/dev/sdd" successfully created.
Next, extend the volume group with the following commands.
[root@mail ~]# vgextend vg1 /dev/sdd
  Volume group "vg1" successfully extended
After that, you can verify the volume group details
[root@mail ~]# pvdisplay
  --- Physical volume ---
  PV Name               /dev/sdc
  VG Name               vg1
  PV Size               20.00 GiB / not usable 4.00 MiB
  Allocatable           yes (but full)
  PE Size               4.00 MiB
  Total PE              5119
  Free PE               0
  Allocated PE          5119
  PV UUID               bBTp1Z-YxGT-6JSw-Gihv-DYpg-mCRv-RoCx9f

  --- Physical volume ---
  PV Name               /dev/sdd
  VG Name               vg1
  PV Size               20.00 GiB / not usable 4.00 MiB
  Allocatable           yes
  PE Size               4.00 MiB
  Total PE              5119
  Free PE               5119
  Allocated PE          0
  PV UUID               EZw0va-6Z03-iLTi-0FO8-bReZ-K4eV-kstTQo
Finally, you can extend the Logical Volume with the following command. In this command I have added 2.5GB to lv1
[root@mail ~]# lvextend -L +2.5G -r /dev/vg1/lv1
  Size of logical volume vg1/lv1 changed from 10.00 GiB (2560 extents) to 12.50 GiB (3200 extents).
  Logical volume vg1/lv1 successfully resized.
resize2fs 1.42.9 (28-Dec-2013)
Filesystem at /dev/mapper/vg1-lv1 is mounted on /newspace; on-line resizing required
old_desc_blocks = 2, new_desc_blocks = 2
The filesystem on /dev/mapper/vg1-lv1 is now 3276800 blocks long.
You can verify the details by
[root@mail ~]# lvdisplay /dev/vg1/lv1
  --- Logical volume ---
  LV Path                /dev/vg1/lv1
  LV Name                lv1
  VG Name                vg1
  LV UUID                0UcqUR-EotB-t3Eh-5w3V-rtA4-SALb-uffk0P
  LV Write Access        read/write
  LV Creation host, time mail.onedashline.com, 2022-06-05 10:30:48 +0000
  LV Status              available
  # open                 1
  LV Size                12.50 GiB
  Current LE             3200
  Segments               2
  Allocation             inherit
  Read ahead sectors     auto
  - currently set to     8192
  Block device           253:0
If you could scroll up you would earlier size of lv1 was 10 GB.
Now let’s say you want to use the remaining vg1 space to increase another logical volume lv2
[root@mail ~]# lvextend -l +100%FREE -r /dev/vg1/lv2
fsck from util-linux 2.23.2
/dev/mapper/vg1-lv2: clean, 11/655360 files, 83137/2620416 blocks
  Size of logical volume vg1/lv2 changed from <10.00 GiB (2559 extents) to 27.49 GiB (7038 extents).
  Logical volume vg1/lv2 successfully resized.
resize2fs 1.42.9 (28-Dec-2013)
Resizing the filesystem on /dev/mapper/vg1-lv2 to 7206912 (4k) blocks.
The filesystem on /dev/mapper/vg1-lv2 is now 7206912 blocks long.
Let’s check the lv2 space
[root@mail ~]# lvdisplay /dev/vg1/lv2
  --- Logical volume ---
  LV Path                /dev/vg1/lv2
  LV Name                lv2
  VG Name                vg1
  LV UUID                MzAnEW-eaqW-q4Y0-0De2-uUq5-Cn9H-Txth1B
  LV Write Access        read/write
  LV Creation host, time mail.onedashline.com, 2022-06-05 10:52:15 +0000
  LV Status              available
  # open                 0
  LV Size                27.49 GiB
  Current LE             7038
  Segments               2
  Allocation             inherit
  Read ahead sectors     auto
  - currently set to     8192
  Block device           253:1
You can see its size has been increased from 9.99 GB to 27.49 GB.
Reduce LVM
Occasionally you want to reduce the size of the logical volume. It’s simple.
[root@mail ~]# lvreduce -L -7.5G -r /dev/vg1/lv2
fsck from util-linux 2.23.2
/dev/mapper/vg1-lv2: clean, 11/1802240 files, 157151/7206912 blocks
resize2fs 1.42.9 (28-Dec-2013)
Resizing the filesystem on /dev/mapper/vg1-lv2 to 5240832 (4k) blocks.
The filesystem on /dev/mapper/vg1-lv2 is now 5240832 blocks long.

  Size of logical volume vg1/lv2 changed from 27.49 GiB (7038 extents) to 19.99 GiB (5118 extents).
  Logical volume vg1/lv2 successfully resized.
Conclusion
This is how you create, extend, shrink, and resize the logical volumes using LVM. I hope now it would have been quite clear to you. Let me know in comments if I miss anything.
Leave a Reply
Want to join the discussion?Feel free to contribute!