Install CyberPanel on Ubuntu and Create WordPress Website
Cyberpanel is a modern and free control panel loaded with features. It’s a great alternative to cPanel or Plesk. In fact, it outshines other open-source control panels like Virtuamin, VestaCP, CentOS Web Panel, etc. It works on top of the OpenLiteSpeed server. Apart from installing normal applications like WordPress, Joomla, Magento, Prestashop it also features email marketing application like Mautic. Some of the features of cyberpanel are
- In built Email Marketing Section
- Docker Containerization
- Auto SSL
- Outofbox WordPress installation
- Email List Verification
- Multi PHP
- Easy backup
- File Manager
- Incremental backup
- Firewall/Security
- FTP server etc.
In this article, you will learn to install CyberPanel on Ubuntu 20.04. You will also learn to create a WordPress website on CyberPanel.
- Requirements for CyberPanel
- Installing CyberPanel
- Creating and Updating Nameservers for main domain
- Installing and Enabling SSL
- Installing WordPress
Requirements for CyberPanel
- A domain name from Godaddy or Namecheap
- A VPS or cloud with atleast 1 GB RAM. I am using Contabo in this demonstration. I have prepared list of VPS with open port 25, just in case you want to provide emailing to your customers as well.
Though CyberPanel recommends getting a minimum of 1 GB of RAM, I highly recommend you to get at least 2 GB RAM. This will save you from trouble later.
I already have a video lecture on how to purchase VPS from Contabo, that you can follow to buy the VPS.
Installing CyberPanel
Installation of cyberpanel is pretty straightforward and no brainer. All you need to do is run a single command to install it. But before that you should update Ubuntu.
Connecting to Remote VPS
Once you have the IP address, username, and password for the VPS, first of all, connect to remote VPS. If you are on a Windows machine you will need a special SSH client called Putty or BitVise. Linux and Mac user can open their terminal.
First of all switch to root user
sudo -i
The next step is to update the OS.
apt update -y
After that upgrade the packages using the following command.
apt upgrade -y
Now next command will begin the installation of CyberPanel.
sh <(curl https://cyberpanel.net/install.sh || wget -O - https://cyberpanel.net/install.sh)
Following this, you will be asked a few questions, just answer them.
                CyberPanel Installer v2.1.1

1. Install CyberPanel.

2. Exit.


  Please enter the number[1-2]: 1
Here answer 1 obviously
 CyberPanel Installer v2.1.1

RAM check : 223/1682MB (13.26%)

Disk check : 4/30GB (18%) (Minimal 10GB free space)

1. Install CyberPanel with OpenLiteSpeed.

2. Install Cyberpanel with LiteSpeed Enterprise.

3. Exit.


  Please enter the number[1-3]: 1
Here also you have to answer 1, otherwise, you need a license to the enterprise version
Install Full service for CyberPanel? This will include PowerDNS, Postfix and Pure-FTPd.

Full installation [Y/n]: Y
In the above screen answer Y
Do you want to setup Remote MySQL? (This will skip installation of local MySQL)

(Default = No) Remote MySQL [y/N]: N
Here, your answer should b N, unless you have remote MySQL. After that, you will be asked to press enter to continue.
Press Enter key to continue with latest version or Enter specific version such as: 1.9.4 , 2.0.1 , 2.0.2 ...etc
Next, you will be asked to set a password. I usually set the password instead of choosing the other 2 options. Therefore answer s.
Please choose to use default admin password 1234567, randomly generate one (recommended) or specify the admin password?
Choose [d]fault, [r]andom or [s]et password: [d/r/s] s
On the next screen type your password and enter
Please enter your password:
Password: Confirm Password:
Next, answer Y to install Memcached and other PHP extensions. These will be required later.
Do you wish to install Memcached process and its PHP extension?
Please select [Y/n]: Y
Further, you will be asked whether you want to install the Redis process and its extension. Answer Y.
Do you wish to install Redis process and its PHP extension?
Please select [Y/n]:
At last, you will be asked whether you want to set up a watchdog. I usually answer Y, even though this is in beta.
Would you like to set up a WatchDog (beta) for Web service and Database service ?
The watchdog script will be automatically started up after installation and server reboot
If you want to kill the watchdog , run watchdog kill
Please type Yes or no (with capital Y, default Yes):
Y
At the end of the installation, you will be given login credentials as follows. You will also be asked to restart the server. Answer Y to that.
###################################################################
                CyberPanel Successfully Installed

                Current Disk usage : 9/194GB (6%)

                Current RAM  usage : 308/7961MB (3.87%)

                Installation time  : 0 hrs 12 min 0 sec
                Visit: https://194.163.163.12:8090
                Panel username: admin
                Panel password: *****
                Visit: https://194.163.163.12:7080
                WebAdmin console username: admin
                WebAdmin console password: 9xBXiJwdQWvbFwUv

                Visit: https://194.163.163.12:8090/rainloop/?admin
                Rainloop Admin username: admin
                Rainloop Admin password: Q54ZP8j18Rw3pD

             Run cyberpanel help to get FAQ info
             Run cyberpanel upgrade to upgrade it to latest version.
             Run cyberpanel utility to access some handy tools .

              Website : https://www.cyberpanel.net
              Forums  : https://forums.cyberpanel.net
              Wikipage: https://docs.cyberpanel.net
              Docs    : https://cyberpanel.net/docs/

            Enjoy your accelerated Internet by
                CyberPanel & OpenLiteSpeed
###################################################################
If your provider has a network-level firewall
Please make sure you have opened following port for both in/out:
TCP: 8090 for CyberPanel
TCP: 80, TCP: 443 and UDP: 443 for webserver
TCP: 21 and TCP: 40110-40210 for FTP
TCP: 25, TCP: 587, TCP: 465, TCP: 110, TCP: 143 and TCP: 993 for mail service
TCP: 53 and UDP: 53 for DNS service
Would you like to restart your server now? [y/N]: y
Now open the first URL https://194.163.163.12:8090 in the browser and log in to CyberPanel.
Creating Website and Updating Nameservers
Now the first thing you should do is to login into the domain registrar and create hostnames. Also, know as custom nameservers or glue records. Usually, every domain registrar has a tutorial for this.
Next, open websites
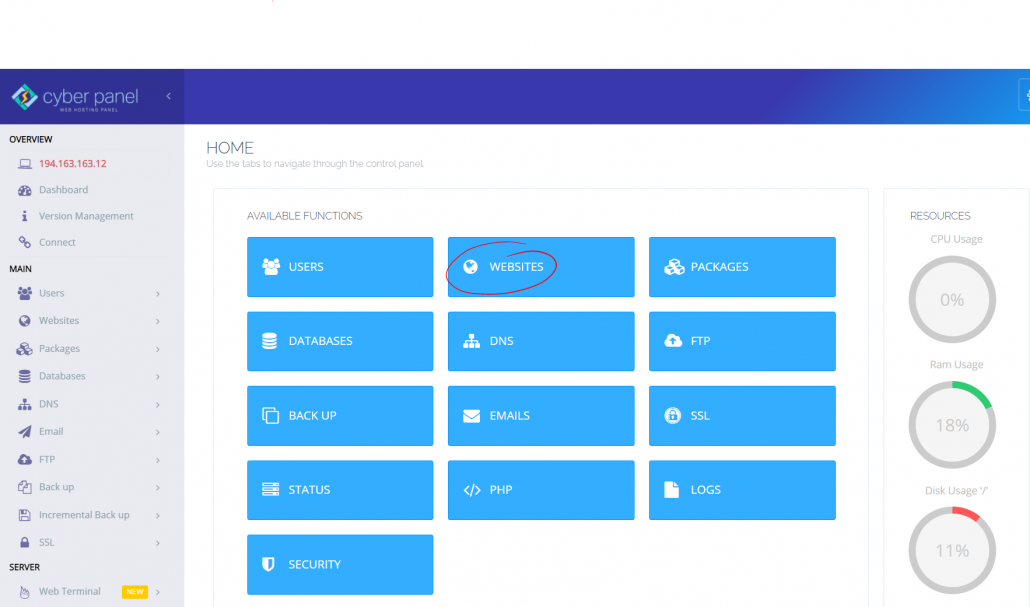
and then create a website
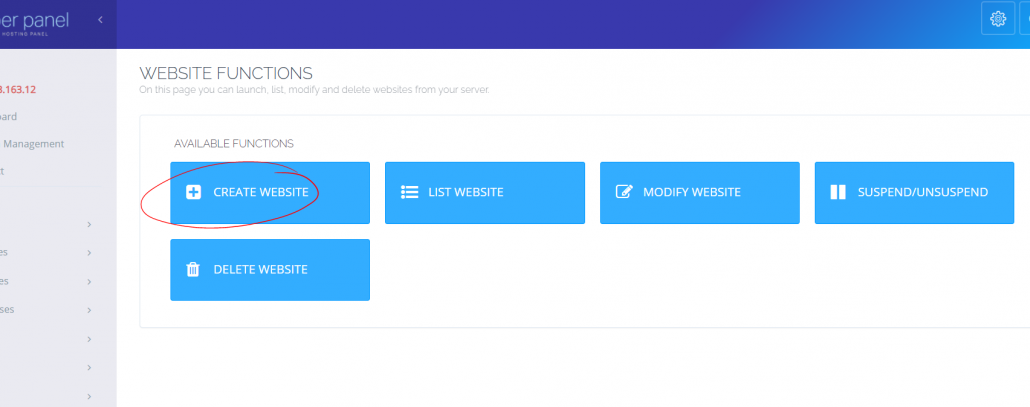
Now fill in the details like domain name, email, select PHP and check the required boxes. I usually check them all.
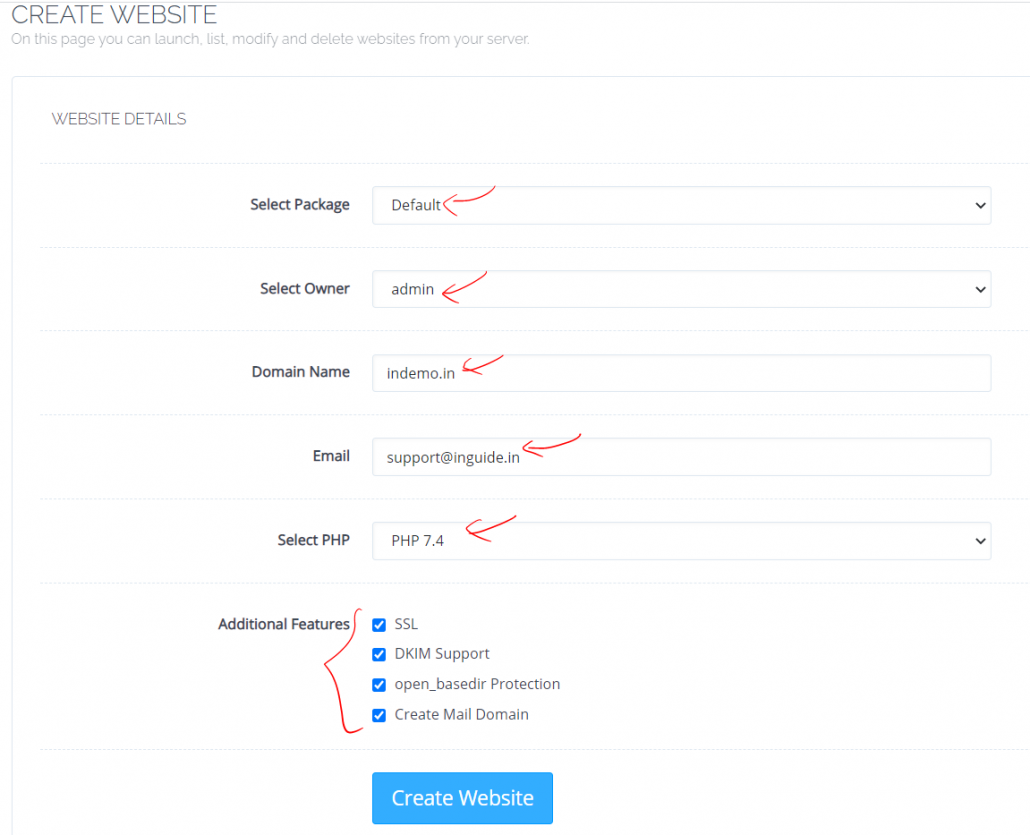
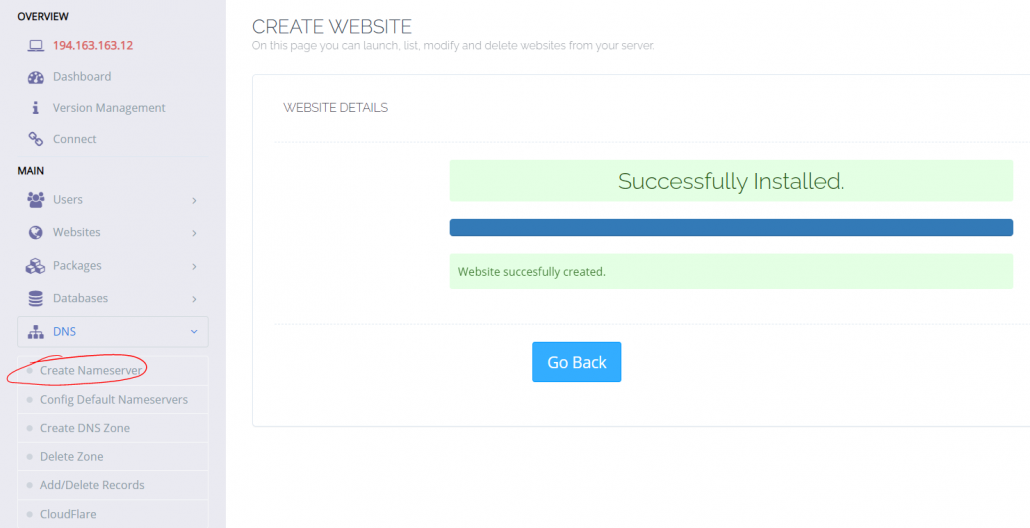
Click create a website and your website will be ready.
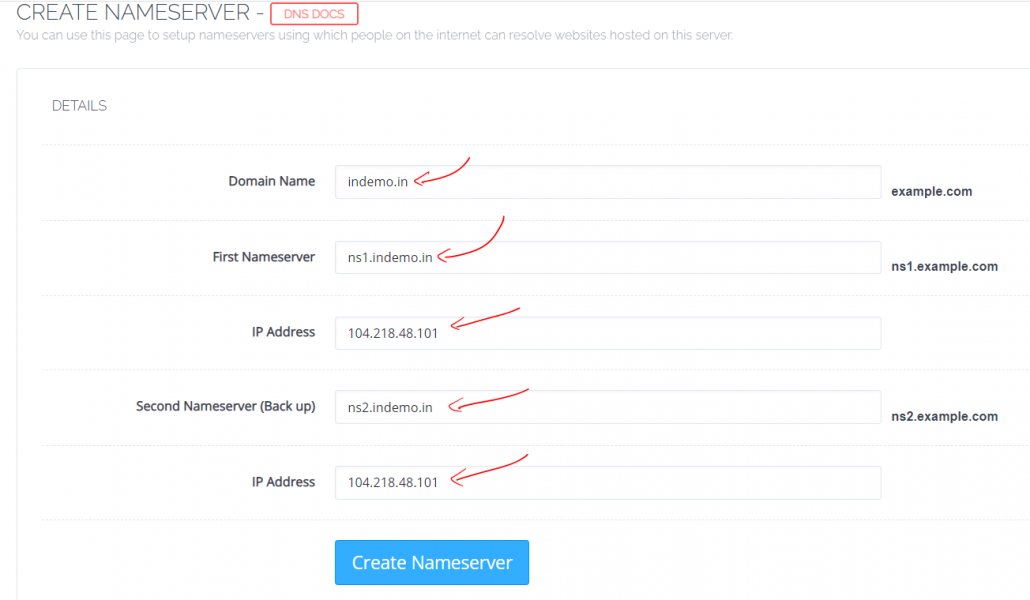
Now to create nameservers, go to Create Nameserver
Then, fill in the details as follows
Installing and Enabling SSL
To install SSL for both website and cyberpanel, go to SSL in left menu
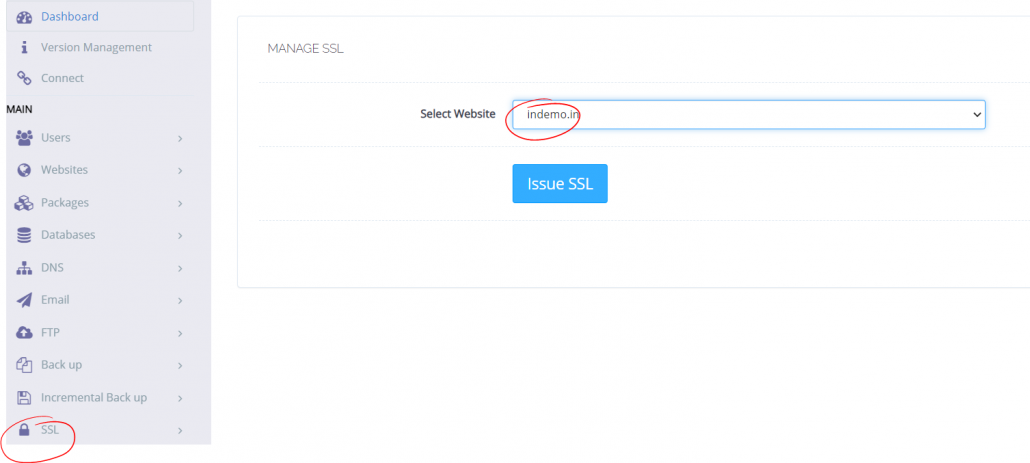
Thereafter select the type and click Issue SSL.
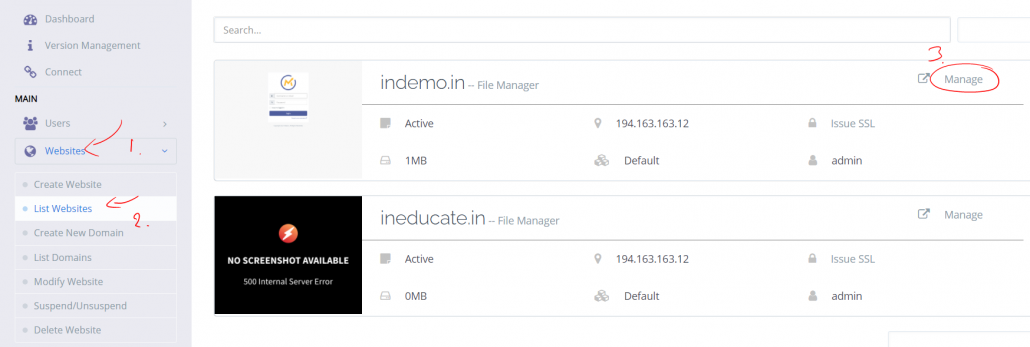
Installing WordPress
It’s super easy to install WordPress on CyberPanel. Go to the Websites in the left menu and then List Websites and then Manage
Now scroll all the way to the bottom. There you will find WordPress and other options.
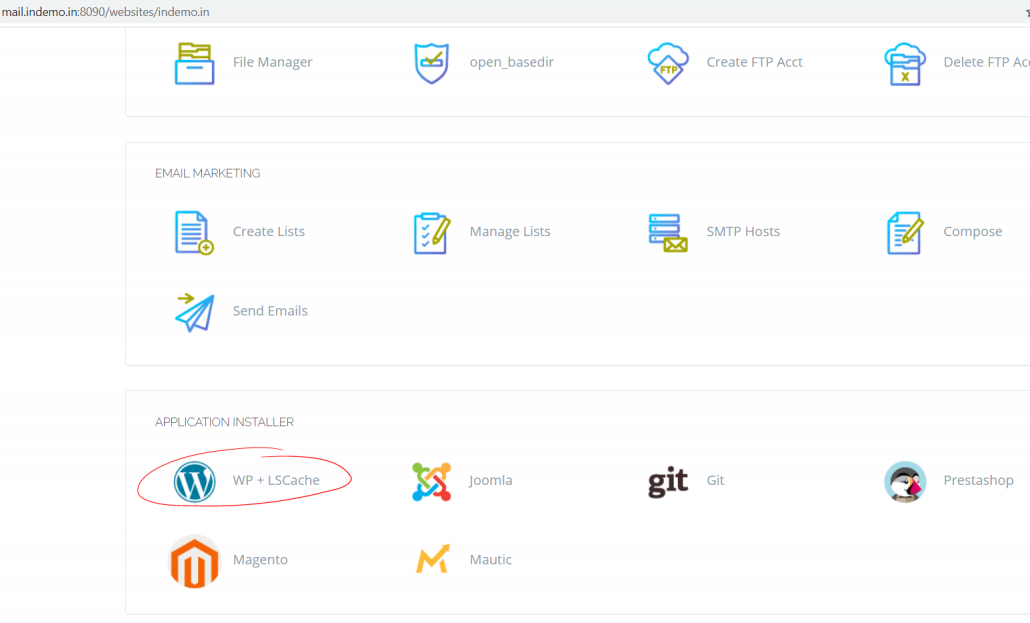
Fill in all the information asked for WordPress and click Install Now
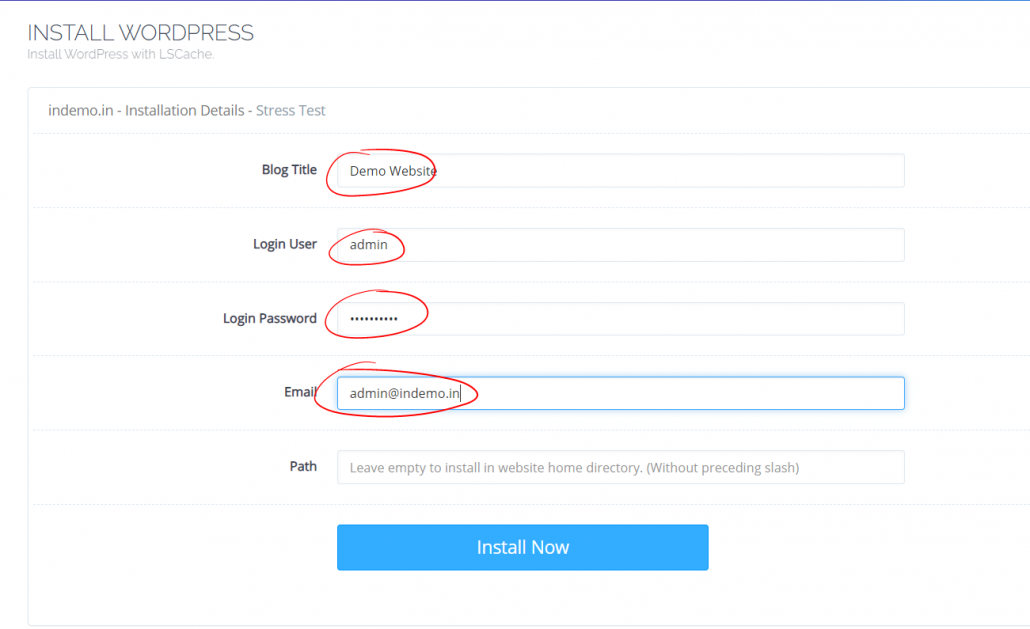
After installation, go to your URL to enjoy freshly installed WordPress on LiteSpeed server.
Conclusion
Installing Cyberpanel is easier than most Open source control panels. Also with a nice UI and modern look along with the best features cyber panel is the best in the market in my view.
Let me know what you think of CyberPanel in the comment box.
i try many time but i have many problem
1-Failed to enable unit: Refusing to operate on linked unit file redis.service
2-authentication failed” error in Rainloop
3–rw-r–r– 1 root root 1.2K Aug 16 10:32 redis-server.service
4-Error Failed to start redis service Unit redis-server service is masked
5-contaboserver.net systemd[1]: Failed to start Advanced key-value stor
6-Failed to start Advanced key-value store
7-Sub-process /usr/bin/dpkg returned an error code (1)
how i can fix this all problem made if when i udsed ubuntu 18 or cento 7
i try to use ubuntu 20.4 with this guide and all work fine with me thank you again :]
Did you update the server?
For Ubuntu
Thank you, Your video is very good and very much appreciated. I have issue in DNS propagation when i am hosting multiple website in same server. Even I used same server from Contabo VPS. Do you have solutions for this around 5 days finished not yet updated in all DNS server. The domain is registered in Godaddy as per your video, i have done everything.
You should open port 53 in your server for dns requests
Hi Dhiraj Rahul,
Could you please create a video how to create a WordPress website using CyberPanel+Ubuntu+WordPress+Maiserver on Oracle Cloud Infrastructure?
Regards,
Ramesh
I will
Hello thanks for what you’re doing… Please can you create a video on how to configure this cyber panel email?
Thank you sir, Now i have fix my problem.
can we make a website without domain name? such as IP domain?
Yes, you can use IP till you buy a domain. But still, you have to provide a domain name (even though it’s not registered) in order to install WordPress.
Thank you very much, I wish you a long life.
Please Help Me. How To Migrating WordPress to CyberPanel from Any Other host?
Please tell me
Sure, will make video
Please can you help me I can’t login to snappy Mail after creating email account with cyber panel
How I can setup ip rotator for the smtp server installed in cyberpanel using contavo. I really really the the answer of my question. Please help me.
You cannot.
Thank you so much for this video,please how can you also build cpanel smtp is it the same process
Yes