Mailu Docker Compose Setup – Build Self Hosted Mail Server
Mailu is powerful full featured mail server build as a Docker image set. It is open source and free software backed by plethora of developers on github. Some of it’s features are
- Standard email server, IMAP and IMAP+, SMTP and Submission
- Advanced email features, aliases, domain aliases, custom routing
- Web access, multiple Webmails and administration interface
- User features, aliases, auto-reply, auto-forward, fetched accounts
- Admin features, global admins, announcements, per-domain delegation, quotas
- Security, enforced TLS, Letsencrypt!, outgoing DKIM, anti-virus scanner
- Antispam, auto-learn, greylisting, DMARC and SPF
- Freedom, all FOSS components, no tracker included
In this tutorial, we will learn to setup and install Mailu on Debian 9 step by step to build self hosted mail server.
Requirements for Mailu
- A domain name
- A VPS or Cloud with minimum 2 GB of RAM
Official Mailu documentation suggests installing Mailu on Debian 8 & 9 though it claims to work on Ubuntu as well. However, in this demonstration, I will stick to Debian 9. Also, Debian OS is available with all VPS/cloud providers, therefore you should have any issue at all. Just in case if you couldn’t find Debian on your hosting then start to try on Ubuntu.
I will be using Turnkey Internet for the demonstration as they provide VPS with open port 25, necessary for emailing.
Initial DNS Setup
You need to create few records for domain to get started. They are as follows.
| Type | Host | Value |
| A | Your IP address | |
| MX | @ | mail.yourdomain.com 10 |
Initial Server Setup for Mailu
After the above step, you need to connect to a remote server using IP address and password provided by the hosting. If you are on Windows, then you will need a special SSH client to connect to the remote server. Some of the SSH clients are Putty, BitVise, etc.
Once you are connected to remote server, you need to update the server
apt-get install sudo
sudo -i
apt-get update -y
Next, you have to set the hostname
hostnamectl set-hostname mail.yourdomain.com
Also, set fully qualified domain name (FQDN). For that edit /etc/hosts file
apt install nano -y
nano /etc/hosts
Now, add the line to this file as follows. Don’t forget to replace 123.15.116.167 with your server IP. Just in case if there’s line starting with your IP address is already present make sure following text is present as well or edit it.
123.15.116.167 mail.yourdomain.com mail
Next add firewall rules
sudo ufw allow 25,80,443,110,143,465,587,993,995/tcp
After these steps, your server is ready to install Mailu.
Install Docker and Docker-Compose
First of all you need to install Docker & Docker-Compose to begin with Mailu.
Install Docker on Debian
Start with allowing apt to use repository over HTTPS:
 sudo apt-get update
 sudo apt-get install \
    apt-transport-https \
    ca-certificates \
    curl \
    gnupg \
    lsb-release
Next, add Docker’s official GPG key:
curl -fsSL https://download.docker.com/linux/debian/gpg | sudo gpg --dearmor -o /usr/share/keyrings/docker-archive-keyring.gpg
Now, you need to set up stable repository with following command.
echo \
  "deb [arch=amd64 signed-by=/usr/share/keyrings/docker-archive-keyring.gpg] https://download.docker.com/linux/debian \
  $(lsb_release -cs) stable" | sudo tee /etc/apt/sources.list.d/docker.list > /dev/null
After that, you can install docker with following commands
sudo apt-get update
sudo apt-get install docker-ce docker-ce-cli containerd.io
Verify that Docker Engine is installed correctly by running the hello-world image.
sudo docker run hello-world
Install Docker-Compose
Now, docker engine has been installed successfully, it’s time to install docker-compose
sudo curl -L "https://github.com/docker/compose/releases/download/1.29.1/docker-compose-$(uname -s)-$(uname -m)" -o /usr/local/bin/docker-compose

  % Total    % Received % Xferd  Average Speed   Time    Time     Time  Current
                                 Dload  Upload   Total   Spent    Left  Speed
100   633  100   633    0     0   4914      0 --:--:-- --:--:-- --:--:--  4906
100 12.1M  100 12.1M    0     0  40.7M      0 --:--:-- --:--:-- --:--:-- 40.7M
Update permissions for binary
sudo chmod +x /usr/local/bin/docker-compose
Install Mailu
Now, docker and docker-compose installed, it’s time to install Mailu.
Mailu has made it super easy to generate bin file that you will need to install mail server. Simply go to following link and fill the details as follows.
- https://setup.mailu.io/
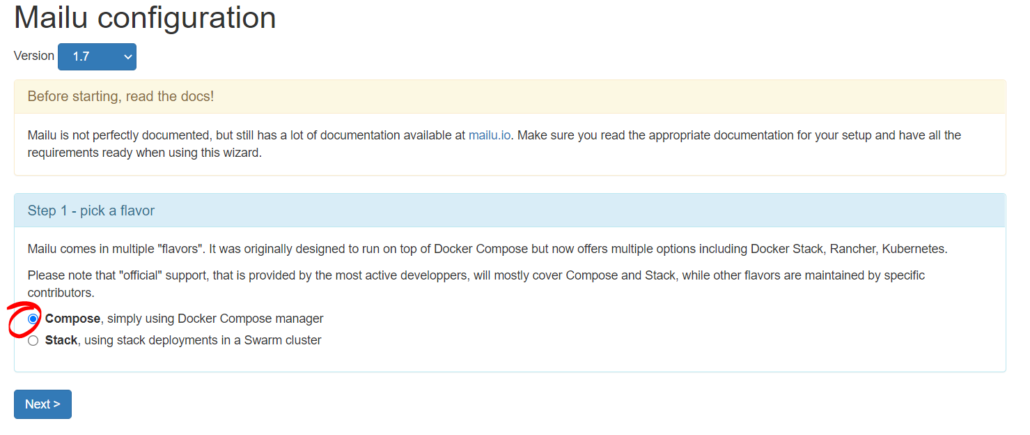
On following screen select compose
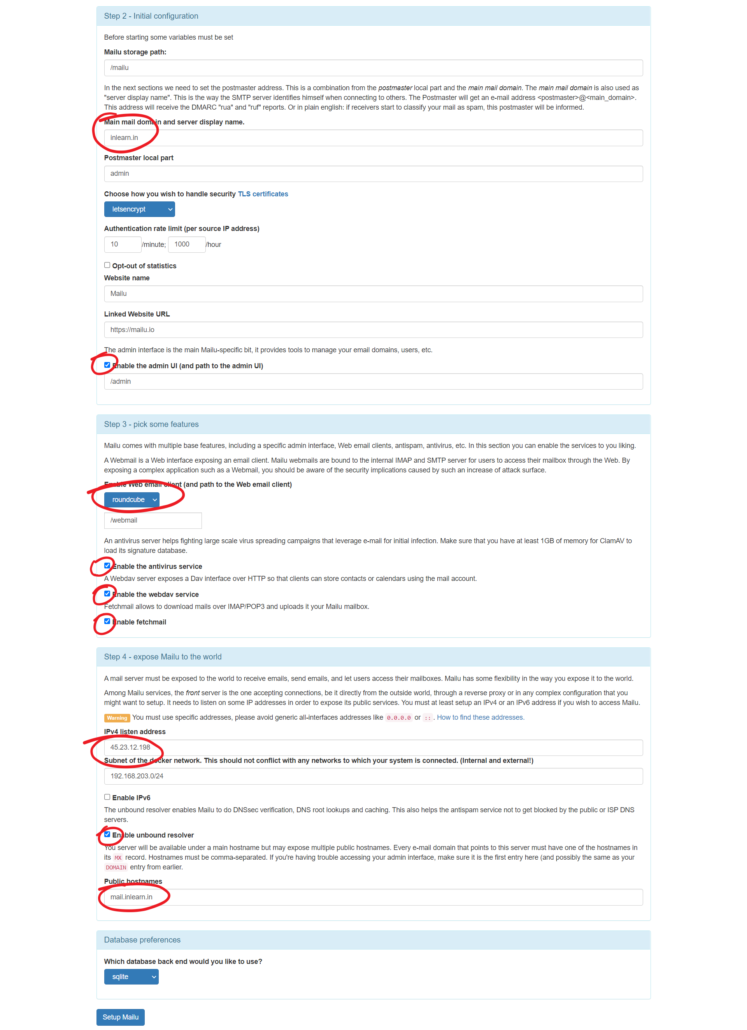
On next screen, fill in the blanks circled in red to generate the configuration file
After that, you will be given with set of commands to run, which will install Mailu mailserver.
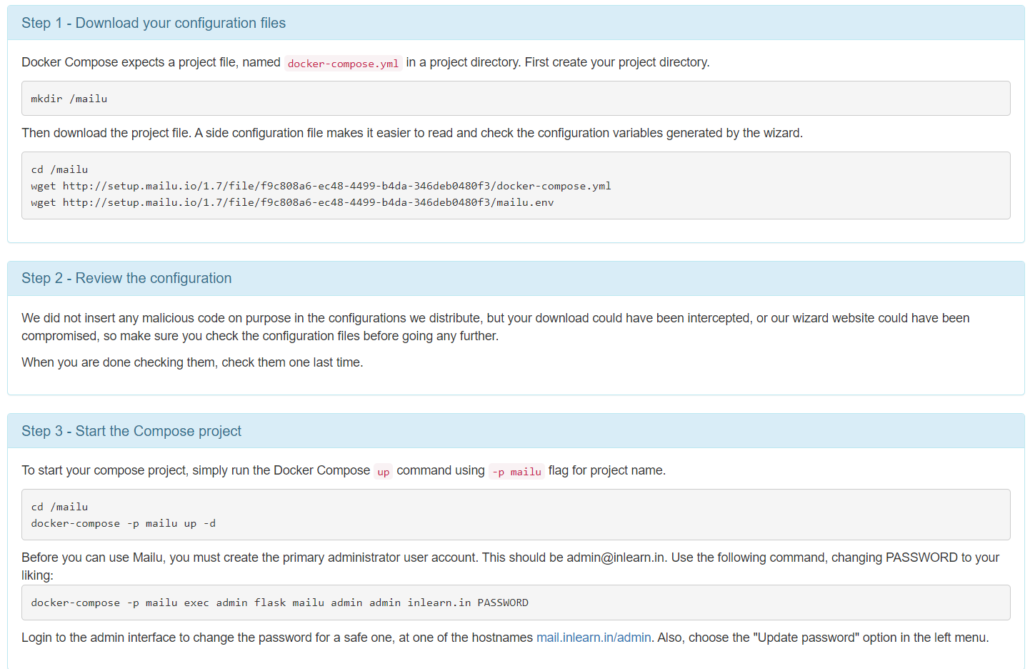
Now, let’s execute commands from above screenshot, but with some additional steps.
First command is to make directory.
root@mail:~# mkdir /mailu
Now, download the configuration files you generated
root@mail:~# cd /mailu
root@mail:/mailu# wget http://setup.mailu.io/1.7/file/f9c808a6-ec48-4499-b4da-346deb0480f3/docker-compose.yml
root@mail:/mailu# wget http://setup.mailu.io/1.7/file/f9c808a6-ec48-4499-b4da-346deb0480f3/mailu.env
Then, review the configuration files. First open docker.yml file
root@mail:/mailu# nano docker-compose.yml
You don’t have to make any changes in this file.
# This file is auto-generated by the Mailu configuration wizard.
# Please read the documentation before attempting any change.
# Generated for compose flavor

version: '2.2'

services:

  # External dependencies
  redis:
    image: redis:alpine
    restart: always
    volumes:
      - "/mailu/redis:/data"

  # Core services
  front:
    image: ${DOCKER_ORG:-mailu}/${DOCKER_PREFIX:-}nginx:${MAILU_VERSION:-1.7}
    restart: always
    env_file: mailu.env
    logging:
      driver: json-file
    ports:
      - "159.203.66.253:80:80"
      - "::1:80:80"
      - "159.203.66.253:443:443"
      - "::1:443:443"
      - "159.203.66.253:25:25"
      - "::1:25:25"
      - "159.203.66.253:465:465"
      - "::1:465:465"
      - "159.203.66.253:587:587"
      - "::1:587:587"
      - "159.203.66.253:110:110"
      - "::1:110:110"
      - "159.203.66.253:995:995"
      - "::1:995:995"
      - "159.203.66.253:143:143"
      - "::1:143:143"
      - "159.203.66.253:993:993"
      - "::1:993:993"
    volumes:
      - "/mailu/certs:/certs"
      - "/mailu/overrides/nginx:/overrides"

  resolver:
    image: ${DOCKER_ORG:-mailu}/${DOCKER_PREFIX:-}unbound:${MAILU_VERSION:-1.7}
    env_file: mailu.env
    restart: always
    networks:
      default:
        ipv4_address: 192.168.203.254

  admin:
    image: ${DOCKER_ORG:-mailu}/${DOCKER_PREFIX:-}admin:${MAILU_VERSION:-1.7}
    restart: always
    env_file: mailu.env
    volumes:
      - "/mailu/data:/data"
      - "/mailu/dkim:/dkim"
    depends_on:
      - redis

  imap:
    image: ${DOCKER_ORG:-mailu}/${DOCKER_PREFIX:-}dovecot:${MAILU_VERSION:-1.7}
    restart: always
    env_file: mailu.env
    volumes:
      - "/mailu/mail:/mail"
      - "/mailu/overrides:/overrides"
    depends_on:
      - front

  smtp:
    image: ${DOCKER_ORG:-mailu}/${DOCKER_PREFIX:-}postfix:${MAILU_VERSION:-1.7}
    restart: always
    env_file: mailu.env
    volumes:
      - "/mailu/overrides:/overrides"
    depends_on:
      - front
      - resolver
    dns:
      - 192.168.203.254

  antispam:
    image: ${DOCKER_ORG:-mailu}/${DOCKER_PREFIX:-}rspamd:${MAILU_VERSION:-1.7}
    restart: always
    env_file: mailu.env
    volumes:
      - "/mailu/filter:/var/lib/rspamd"
      - "/mailu/dkim:/dkim"
      - "/mailu/overrides/rspamd:/etc/rspamd/override.d"
    depends_on:
      - front
      - resolver
    dns:
      - 192.168.203.254

  # Optional services
  antivirus:
    image: ${DOCKER_ORG:-mailu}/${DOCKER_PREFIX:-}clamav:${MAILU_VERSION:-1.7}
    restart: always
    env_file: mailu.env
    volumes:
      - "/mailu/filter:/data"
    depends_on:
      - resolver
    dns:
      - 192.168.203.254

  webdav:
    image: ${DOCKER_ORG:-mailu}/${DOCKER_PREFIX:-}radicale:${MAILU_VERSION:-1.7}
    restart: always
    env_file: mailu.env
    volumes:
      - "/mailu/dav:/data"

  fetchmail:
    image: ${DOCKER_ORG:-mailu}/${DOCKER_PREFIX:-}fetchmail:${MAILU_VERSION:-1.7}
    restart: always
    env_file: mailu.env
    depends_on:
      - resolver
    dns:
      - 192.168.203.254

  # Webmail
  webmail:
    image: ${DOCKER_ORG:-mailu}/${DOCKER_PREFIX:-}roundcube:${MAILU_VERSION:-1.7}
    restart: always
    env_file: mailu.env
    volumes:
      - "/mailu/webmail:/data"
    depends_on:
      - imap


networks:
  default:
    driver: bridge
    ipam:
      driver: default
      config:
        - subnet: 192.168.203.0/24
Next open mailu.env
root@mail:/mailu# nano mailu.env
Here change the SECRET_KEY. You can generate secret key on command line itself. Also, you can do few other changes as well as per your need.
# Mailu main configuration file
#
# This file is autogenerated by the configuration management wizard for compose flavor.
# For a detailed list of configuration variables, see the documentation at
# https://mailu.io

###################################
# Common configuration variables
###################################

# Set to a randomly generated 16 bytes string
SECRET_KEY=zahdieghae6Ceice

# Subnet of the docker network. This should not conflict with any networks to which your system is connected. (Internal and external!)
SUBNET=192.168.203.0/24

# Main mail domain
DOMAIN=swdlv.com

# Hostnames for this server, separated with comas
HOSTNAMES=mail.swdlv.com

# Postmaster local part (will append the main mail domain)
POSTMASTER=admin

# Choose how secure connections will behave (value: letsencrypt, cert, notls, mail, mail-letsencrypt)
TLS_FLAVOR=letsencrypt

# Authentication rate limit (per source IP address)
AUTH_RATELIMIT=10/minute;1000/hour

# Opt-out of statistics, replace with "True" to opt out
DISABLE_STATISTICS=True

###################################
# Optional features
###################################
# Expose the admin interface (value: true, false)
ADMIN=true

# Choose which webmail to run if any (values: roundcube, rainloop, none)
WEBMAIL=roundcube

# Dav server implementation (value: radicale, none)
WEBDAV=radicale

# Antivirus solution (value: clamav, none)
ANTIVIRUS=clamav

###################################
# Mail settings
###################################

# Message size limit in bytes
# Default: accept messages up to 50MB
# Max attachment size will be 33% smaller
MESSAGE_SIZE_LIMIT=50000000

# Networks granted relay permissions
# Use this with care, all hosts in this networks will be able to send mail without authentication!
RELAYNETS=

# Will relay all outgoing mails if configured
RELAYHOST=

# Fetchmail delay
FETCHMAIL_DELAY=600

# Recipient delimiter, character used to delimiter localpart from custom address part
RECIPIENT_DELIMITER=+

# DMARC rua and ruf email
DMARC_RUA=admin
DMARC_RUF=admin

# Welcome email, enable and set a topic and body if you wish to send welcome
# emails to all users.
WELCOME=false
WELCOME_SUBJECT=Welcome to your new email account
WELCOME_BODY=Welcome to your new email account, if you can read this, then it is configured properly!

# Maildir Compression
# choose compression-method, default: none (value: bz2, gz)
COMPRESSION=
# change compression-level, default: 6 (value: 1-9)
COMPRESSION_LEVEL=

###################################
# Web settings
###################################

# Path to redirect / to
WEBROOT_REDIRECT=/webmail

# Path to the admin interface if enabled
WEB_ADMIN=/admin

# Path to the webmail if enabled
WEB_WEBMAIL=/webmail

# Website name
SITENAME=Mailu

# Linked Website URL
WEBSITE=https://mailu.io

###################################
# Advanced settings
###################################

# Log driver for front service. Possible values:
# json-file (default)
# journald (On systemd platforms, useful for Fail2Ban integration)
# syslog (Non systemd platforms, Fail2Ban integration. Disables `docker-compose log` for front!)
# LOG_DRIVER=json-file

# Docker-compose project name, this will prepended to containers names.
COMPOSE_PROJECT_NAME=mailu

# Default password scheme used for newly created accounts and changed passwords
# (value: BLF-CRYPT, SHA512-CRYPT, SHA256-CRYPT, MD5-CRYPT, CRYPT)
PASSWORD_SCHEME=BLF-CRYPT

# Header to take the real ip from
REAL_IP_HEADER=

# IPs for nginx set_real_ip_from (CIDR list separated by commas)
REAL_IP_FROM=

# choose wether mailu bounces (no) or rejects (yes) mail when recipient is unknown (value: yes, no)
REJECT_UNLISTED_RECIPIENT=

# Log level threshold in start.py (value: CRITICAL, ERROR, WARNING, INFO, DEBUG, NOTSET)
LOG_LEVEL=WARNING

###################################
# Database settings
###################################
DB_FLAVOR=sqlite
root@mail:/mailu# apt install pwgen

root@mail:/mailu# pwgen 16

mair3aer7jaiQu0b ohs5de6se5shueN6 ex6ahxeghiVie3ye eiqu8oot7eiYo3Th
oofaePh2taireeL3 Po5oS9shagi6pe0f ohNgaeChooShie0e ipei5Einaecae2zu
Keingoh4ithai3lo OhthohJ4quoofaew oiY6aegh9ohthei9 Aepa7meeleeceire
iacuos6eshaaSimi doh1ohtheiHooph3 ixooZ0ohb4eeHi6w Xak2Doo9eifi2nea
an5iQu9ielae6Goo zahdieghae6Ceice cahrai1nooj2UY1P ohDooC4lith4uu4d
Finally, compose the project with following command
root@mail:/mailu# export MAILU_VERSION=1.8
root@mail:/mailu# docker-compose -p mailu up -d
At last, you need to create admin account.
root@mail:/mailu# docker-compose -p mailu exec admin flask mailu admin admin inlearn.in PASSWORD
Mailu First Run
Now go to the browser and open https://yourdomain.com/admin
Login with username [email protected] and PASSWORD
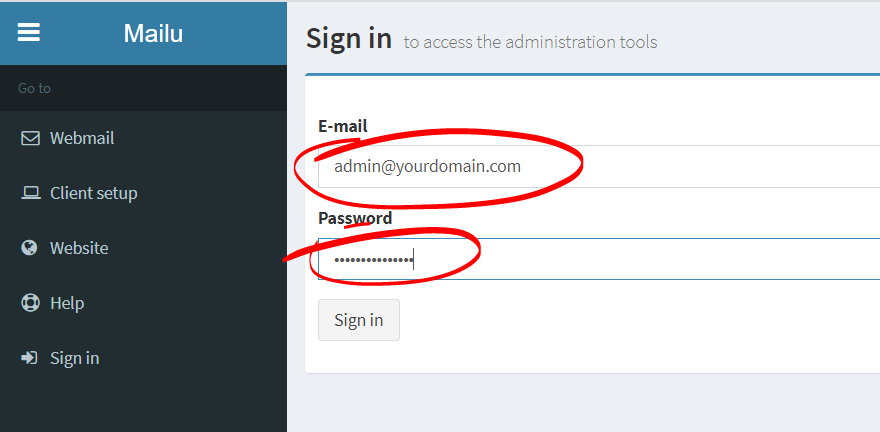
On next, screen change the admin password. Further, you can explore yourself.
Final DNS Setup
To wrap up Mailu Docker installation, you need to create 3 TXT DNS records.
Generate DKIM & DMARC Keys
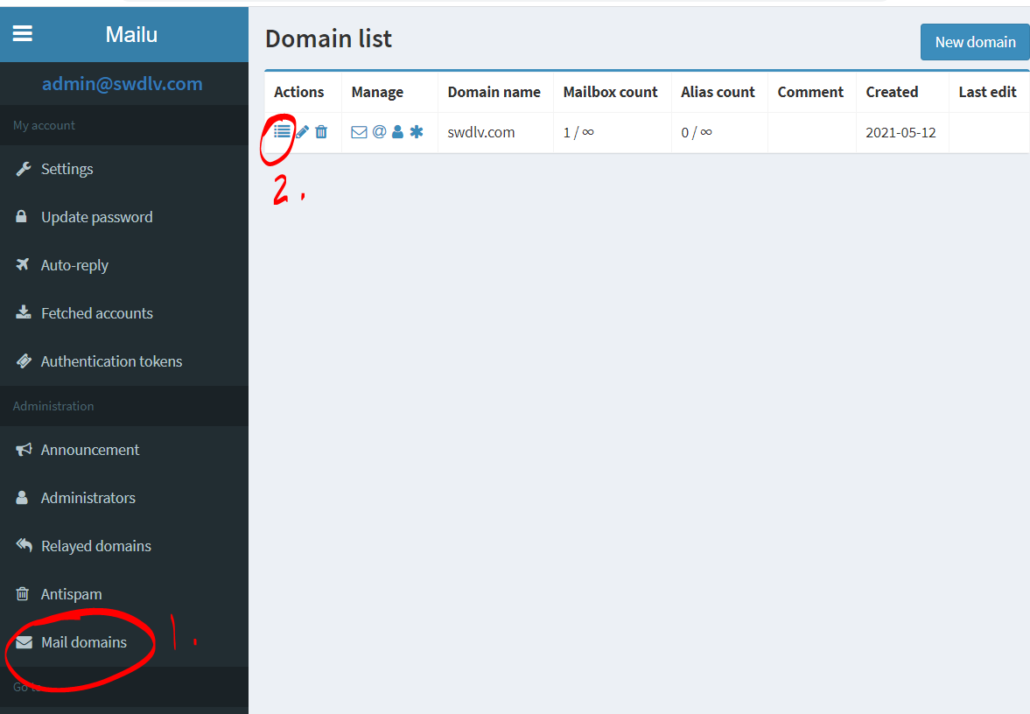
To generate DKIM & DMARC keys go to Mail Domains and then Details of domain as shown below.
Then on next screen click on Generate Keys
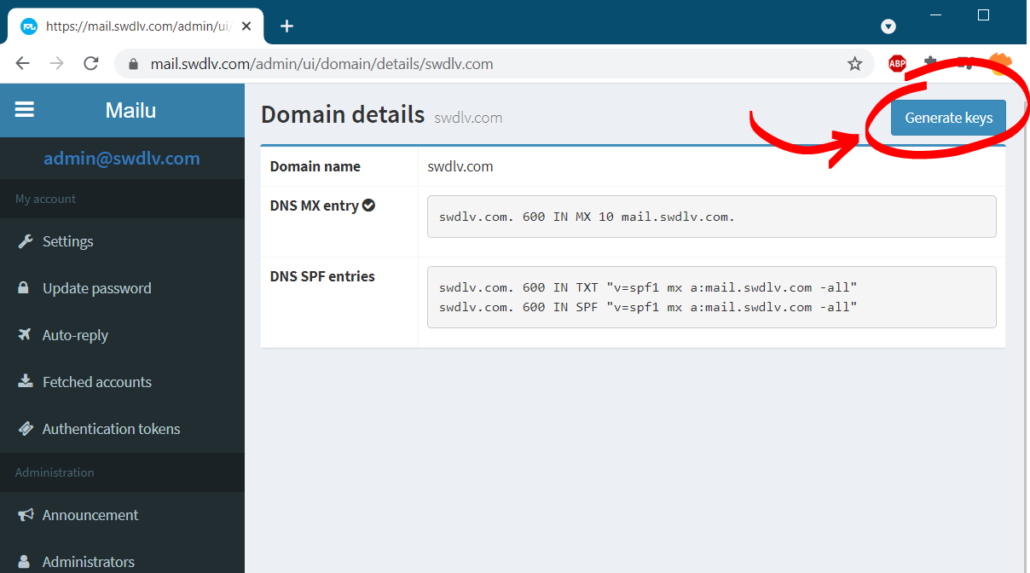
This will generate DKIM Keys and DMARC both.
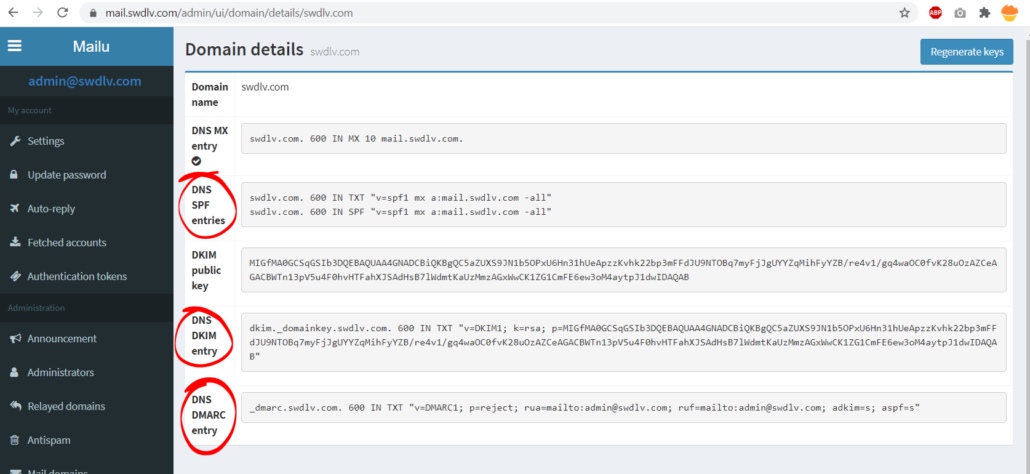
Now, you have all 3 records viz, DKIM, DMARC and SPF. Go to your domain registrar and make these entries.
Conlcusion
Mailu Docker Setup is easy compared to other mailing software. Also, it give you lots of insight regarding your mail server which will prove beneficial when you start using it. You can also add additional domain easily.

Hello,
Please what is minimum requirement for Mailu docker ?
2 GB RAM, 1 vCPU, 20 GB SSD
Please another question between Mailcow and Mailu who is the best ?
What do you think about cloudron mail server,mailinabox,iredmail,openemail.io comparing to mailcow and mailu?
Do you think security mail gateway such as Proxmox Mail Gateway is require or all these mail server security are enough?
Dear ,
Appreciate your guide
FYI Docker Overrides the host network configuration
so enabling the Fire wall is useless , unless you managed the network of you Docker containers
I’m getting ERROR: for front Cannot start service front: driver failed programming external connectivity on endpoint mailu_front_1 …. bind: cannot assign requested address
How can I solve this problem ?
i used debian 9.4, and i noticed that my server is not updating “apt-get update -y”, do u have a solution to this?