
inGuide | Digital Marketing, Online Business & WordPress
  • Home
  • Blog
  • Deals
  • Services
  • Forum
    • New Forum
  • Free Resources
    • inSend: Mailwizz
  • Contact
  • Click to open the search input field Click to open the search input field Search
  • Menu Menu
Hosting

How to install Virtualmin on CentOS 8

Virtualmin is very robust open source control panel. It can be installed on CentOS, Debian, Ubuntu, etc. It runs as module to webmin which is written in perl and provides almost everything required for managing control panel. Once installed you might never need to see command line again even for updating packages. It notifies you as soon as update is available and you can update them with just one click.

Requirement

You need following things to be ready in order to install virtualmin

  • a domain from NameCheap
  • a VPS or cloud with a minimum of 1 GB RAM. I am using Contabo here.

Now, an immediate question could pop up in your mind. How to decide VPS or cloud specification? Well, it completely depends on the amount of traffic your website could generate. Virtualmin is going to consume roughly 512 MB of RAM. Therefore even at the beginning, I would say go with 2 GB RAM and 1 vCPU at least. In this demonstration, I will be using Contabo VPS with 8 GB RAM, enough for Virtualmin and most applications.

I have my domain registered with namecheap. Check out for deals on domain name registration and hosting.

Updating DNS records

After you receive the IP address from VPS seller login to the domain registrar and create custom nameserver also called hostnames/ child nameservers. For example if inguide.in is your domain name, then you will have to create ns1.inguide.in & ns2.inguide.in and in next field pass on the IP address received.

Next, update the nameserver to newly created custom nameservers that is ns1.inguide.in & ns2.inguide.in

Installation

Before you begin the installation you need to connect to the server, with the details provided by the VPS company. It’s super easy to connect to the server from a Linux machine. But fortunately, we have several open-source application which makes the task easier even for Windows user. One such application is putty. After you have downloaded the putty first step is to connect to VPS from your Windows.
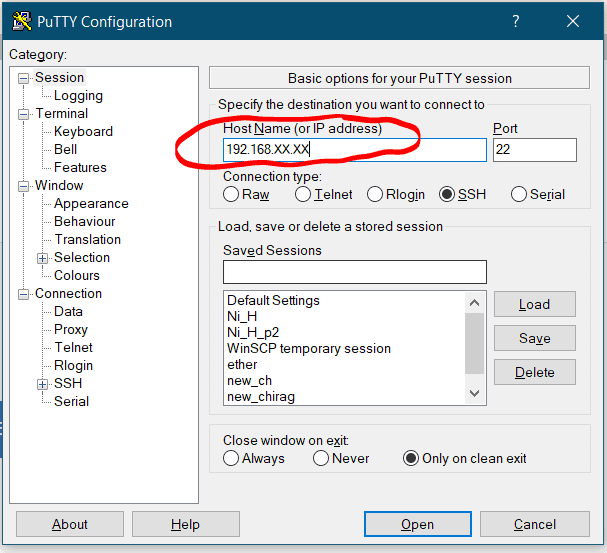
connecting-to-linux-putty

Enter the IP address of your server in the box highlighted in red in above box. A command window will open where you have to enter user name root and password provided by the VPS seller. Sometimes username could be different from root , therefore cross check with VPS seller. If it’s not root then you have to switch to root user with following command.

sudo -i

Next step is to update the server. On CentOS 8 run the following command.

dnf update -y

After that set the hostname

hostnamectl set-hostname server1.inguide.in

Replace inguide.in with your domain name. Now comes the most awaited part. Go to Virtualmin and copy the command. I also have listed it here for convenience.

wget http://software.virtualmin.com/gpl/scripts/install.sh
sudo /bin/sh install.sh

Above command will begin the installation. When asked for confirmation answer yes.

At the end of installation, you will be given an IP address something like this https://192.168.1.1:10000. Open that URL in browser. You will receive warning, click in advanced and proceed.
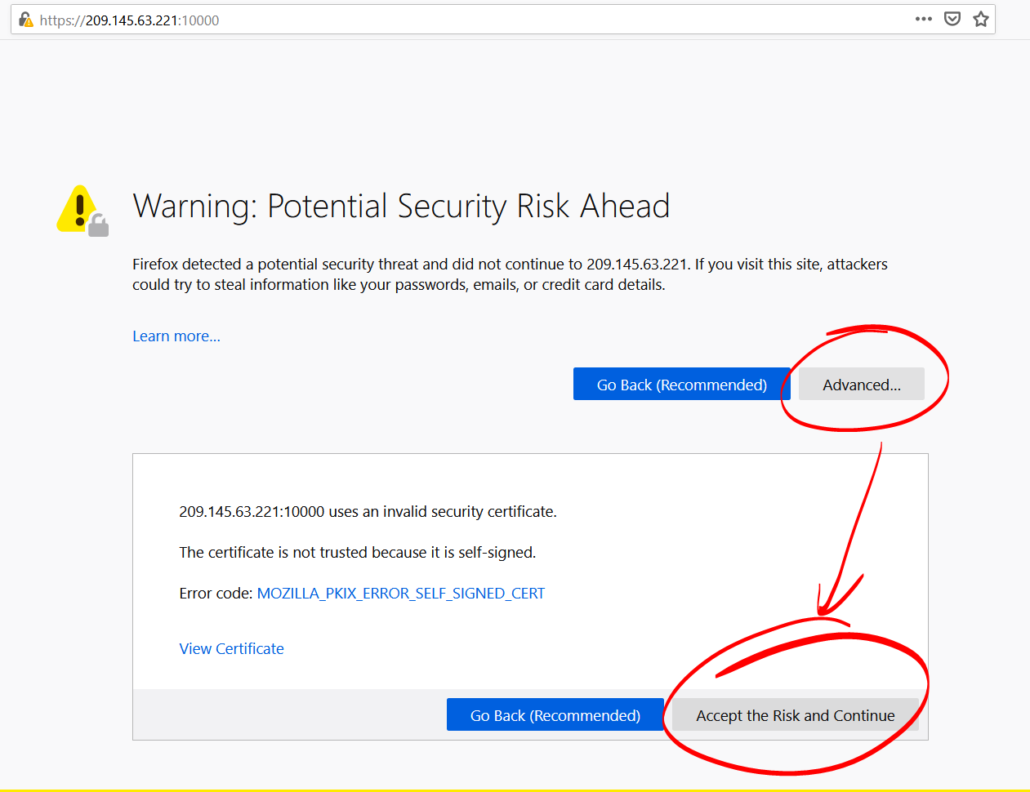
virtualmin-certificate-warning

Configuration

Go to the IP address provided at the end of installation and login with server credentials, that is server username and password.
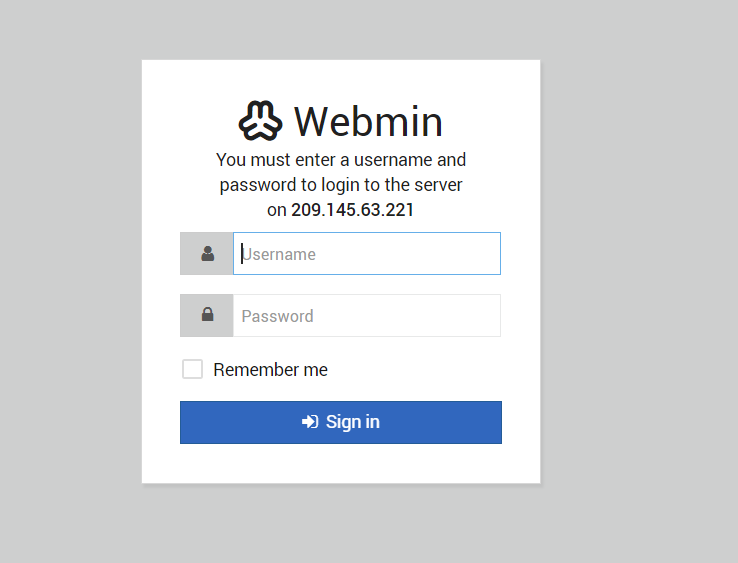
You will be asked several questions during the initial setup.
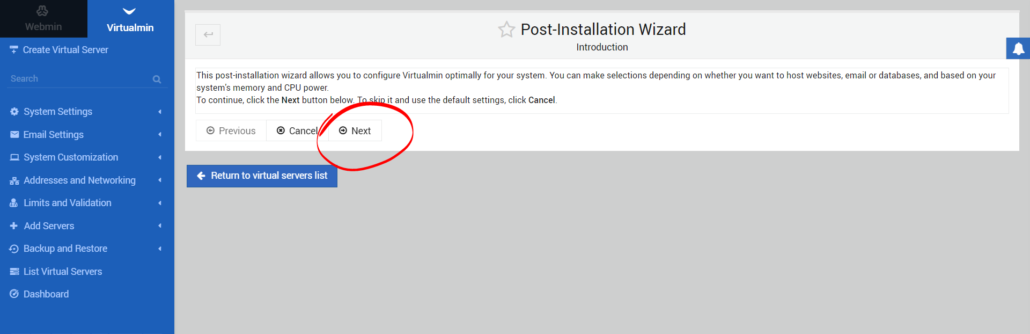
virtualmin-post-installation-wizard

On, next screen make selection according to your server memory, if it’s 1 GB then don’t enable the following features.
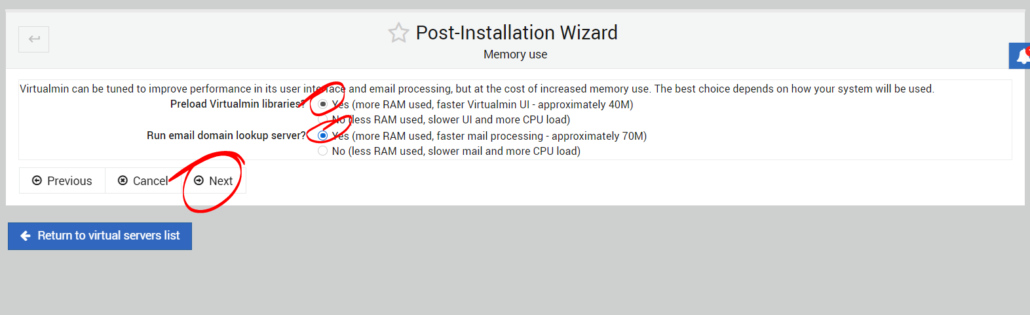
virtualmin-post-installation-wizard-memory-settings

Now, here on following screen it’s up to you to enable ClamAV or not. I like to keep using on demand scanner.
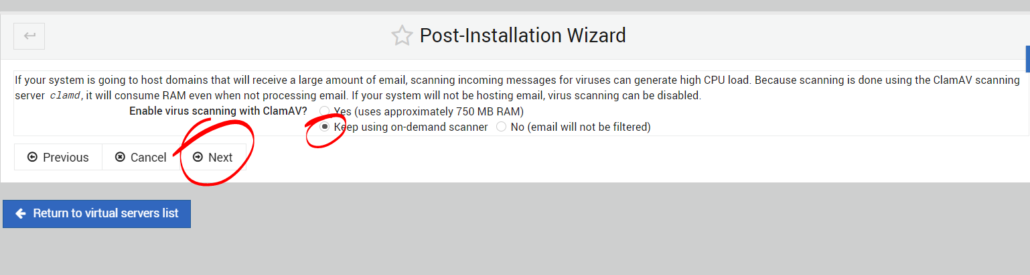
virtualmin-post-installation-wizard

After that, you have enable or disable spam assassin feature.
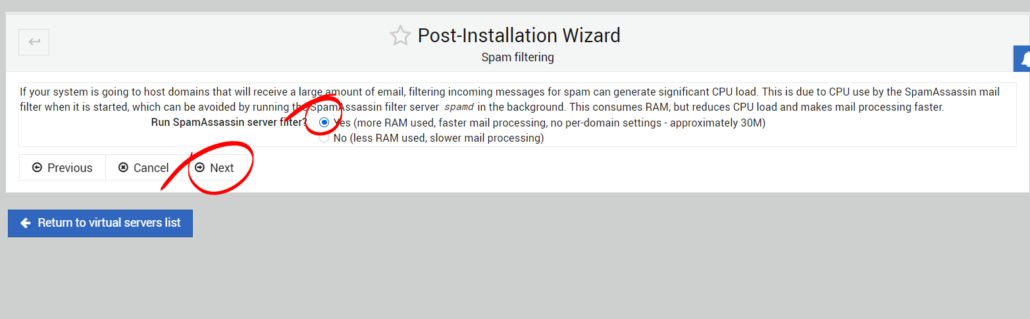
virtualmin-post-installation-wizard-spam-assassin

Next, you have option to select among MySQL and PostgreSQL database server. Make your choice and hit next.
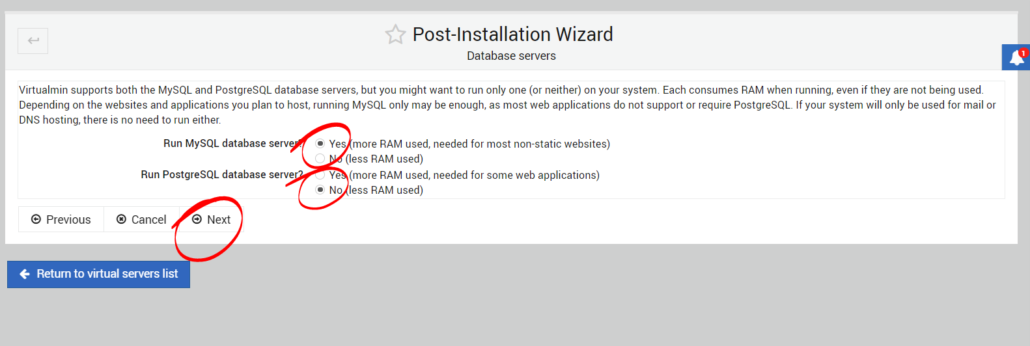
virtualmin-post-installation-wizard-mysql-postgresql

Thereafter, you will have to enter password for MySQL user. Keep this password safe, otherwise you will have to generate it. This will become handy later when you need to create and use a database.
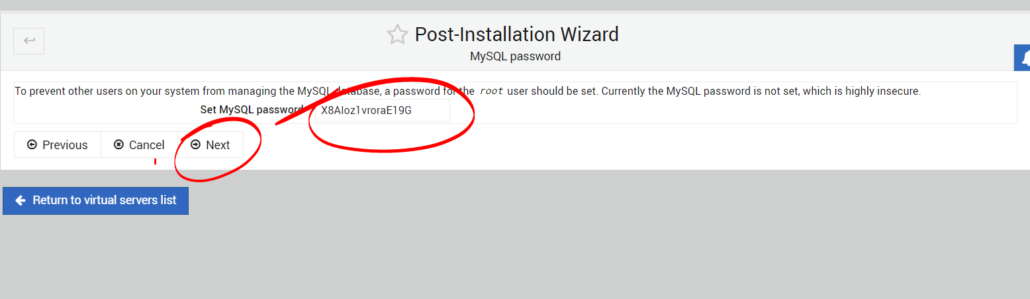
virtualmin-post-installation-wizard-mysql-password-5

Sometimes, you will receive error like this on next screen
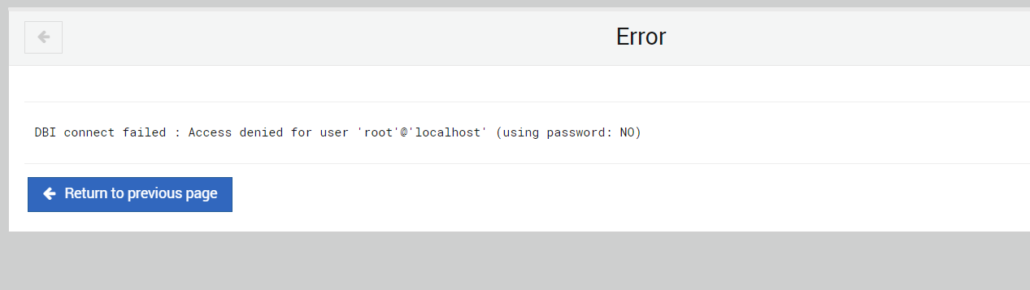
If that is the case with you go to previous page an enter MySQL password once again and check the override box.
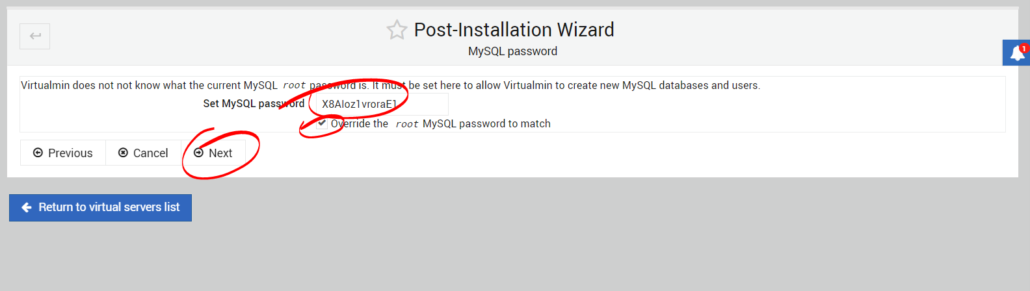
Now, on next screen make wise choice because database connection error depends on this.
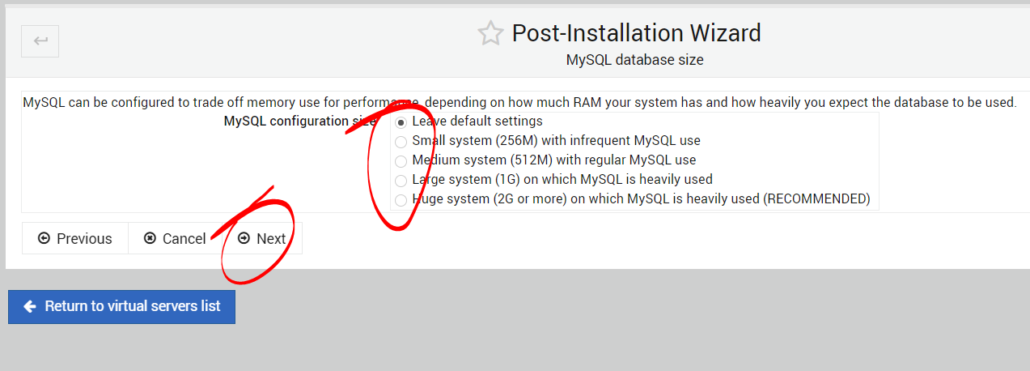
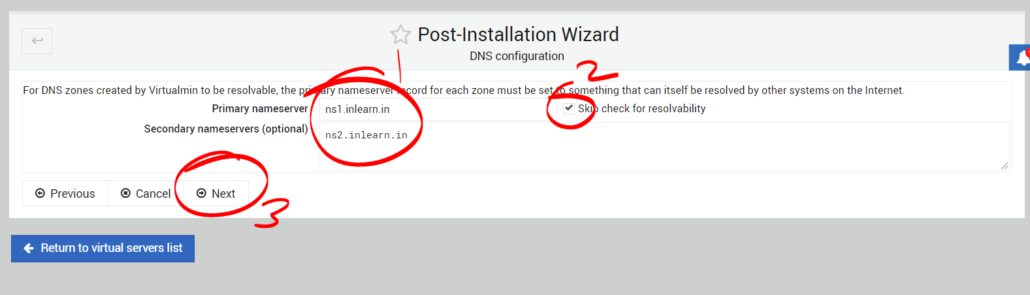
Next, in primary nameservers enter ns1.yourdoman.com and in next field ns2.yourdomain.com. Also check skip for resolvability.
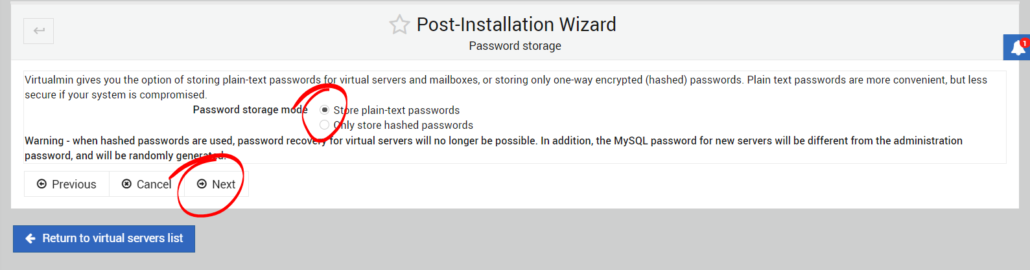
After that, it will ask regarding password storage mode. Make your selection.
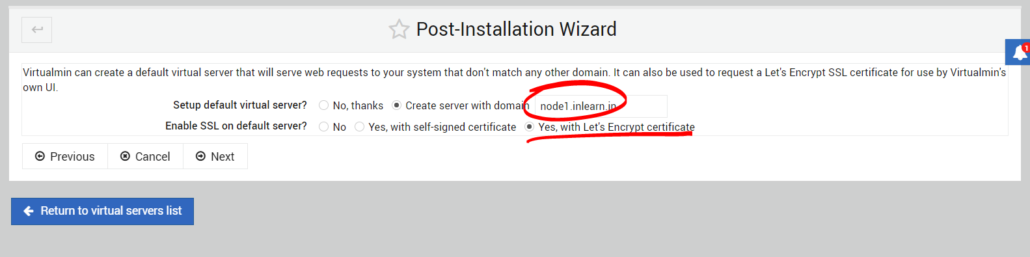
Finally, create default virtual server. It could be your domain or FQDN or even subdomain. Also, you have to option to install SSL certificate right now, though you can always install later.
After you finish going through initial configuration wizard, next you refresh the configuration. Now, create ” Virtual Server ” with main domain to finish the configuration.

After that you can install favorite apps on Virtualmin.

Conclusion

Installing virtualmin though seems to be difficult task, is not that hard. With 2 line install command it’s not only easy to install but also serve well the need of a user.AA

March 13, 2021/5 Comments/by Dhiraj Rahul
Share this entry
  • Share on Facebook
  • Share on X
  • Share on WhatsApp
  • Share on Pinterest
  • Share on LinkedIn
  • Share on Tumblr
  • Share on Vk
  • Share on Reddit
  • Share by Mail
https://inguide.in/wp-content/uploads/2021/02/inguide_logo_red_340_156-300x138.png 0 0 Dhiraj Rahul https://inguide.in/wp-content/uploads/2021/02/inguide_logo_red_340_156-300x138.png Dhiraj Rahul2021-03-13 16:55:512021-05-15 01:58:18How to install Virtualmin on CentOS 8
5 replies
  1. Biaphra Araujo
    Biaphra Araujo says:
    March 30, 2022 at 11:50 am

    I’m from Brazil and I congratulate you for your website and your videos.

    Reply
    • Dhiraj Rahul
      Dhiraj Rahul says:
      April 19, 2022 at 2:10 pm

      Thanks

      Reply
  2. Ken
    Ken says:
    August 26, 2022 at 7:15 am

    Please how do I install on Almalinux 9. Its giving me error when I try this process

    Reply
    • Dhiraj Rahul
      Dhiraj Rahul says:
      August 29, 2022 at 11:01 am

      Virtualmin doesn’t support ALMALINUX 9 yet, install on ALMALINUX 8.
      Thanks

      Reply
  3. SBL Work Done
    SBL Work Done says:
    August 5, 2024 at 7:04 am

    Please tell me is there any similar article about how to connect VirtualMin with MailWizz… I am unable to set up the host name and validate the email in MailWizz… My Hosting is on Contabo and I have use Name Cheap for Domain.. I have set up all advance DNS options…

    Reply

Leave a Reply

Want to join the discussion?
Feel free to contribute!

Leave a Reply Cancel reply

Your email address will not be published. Required fields are marked *

Table of Contents

Search Search

Recent Posts

  • Install Mattermost on Ubuntu/Debian
  • 17 Popular Free & Paid Mail Transfer Agents
  • Top 10 VPN Service Providers & Why!!
  • 15 Best Canva Alternatives for Graphic Design [Free & Paid]
  • 12 Best third-party SEO tools for your website
  • Best NFT Marketplace For Beginners
  • Best WordPress ad management plugin
  • What is Domain Name System blacklist (DNSBL)?
  • Introduction to the Basics of Linux
  • What is Proxy Server?

Categories

  • Chat & Collaboration
  • Domain
  • Email Marketing
  • Email Service
  • Graphic Design
  • Hosting
  • Learning Management System
  • Linux
  • Miscellaneous
  • Proxy
  • Search Engine Optimization
  • SMS
  • SMTP server
  • WooCommerce
  • Wordpress
  • WP Security
Popular
  • Postal-smtp-server
    Build Postal SMTP Server & Send Bulk Emails Step by...March 25, 2021 - 5:19 am
  • install-configure-powermta-centos-8
    Install & Configure PowerMTA on CentOS with IP rot...February 15, 2021 - 4:23 am
  • postal-create-SMTP-add-domain-SSL
    Simplest Way to Configure Postal & Create SMTP + Install...March 27, 2021 - 9:20 am
  • Install CyberPanel on Ubuntu and Create WordPress Websi...September 22, 2021 - 10:05 am
  • Create Mail Server on Windows with Open Source hMailSer...June 13, 2021 - 10:15 am
  • zimbra-free-ssl-certificate-install
    How to Install Free SSL Certificate on Zimbra Mail Serv...May 9, 2021 - 2:21 pm
  • install-zimbra-mail-server-on-centos-8
    Install Zimbra Mail Server on CentOS 7/8 Step by StepMay 9, 2021 - 6:05 am
  • Install and Configure MailCow – Best Self Hosted Mail...May 12, 2021 - 10:32 am
  • lets-encypt-certificate
    Installing Let’s Encrypt Free SSL Certificate on ...March 24, 2021 - 7:36 am
  • install-wordpress-cloud-hosting
    Super Easy Way to Install WordPress on Cloud Hosting in...March 30, 2021 - 1:35 am
Comments
  • vikasCannot "Build a new mail server" #3295 On a fresh installation...May 15, 2025 - 1:19 pm by vikas
  • SivaHow can find about aol blocking and know about email inbox...February 26, 2025 - 7:04 pm by Siva
  • RAKESH GUPTAWe want to change our default CentOS Mail Server to something...December 5, 2024 - 7:15 am by RAKESH GUPTA
  • LavisHey, Can you help me to choose good SMTP server between...November 18, 2024 - 11:12 am by Lavis
  • ApostleThis question is never answeredOctober 29, 2024 - 6:19 am by Apostle
Tags
Ahrefs Aol Canva dkim dkim generator dkim powermta dmarc generator easyengine email deliverability free Gmail install docker ubuntu install free ssl zimbra install mailcow install mailwizz install wordpress install wordpress on google install zimbra centos 8 iredmail mailcow Mailu mailu docker compose mailwizz Memberpress MTA open source chat app outlook Plugin Postal postal server postal smtp private chat server rocket.chat SEO smtp server spf generator Talos VPN WooCommerce WordPress wordpress on cloud hosting Yahoo zimbra zimbra mail server zimbra ssl

Follow us on Facebook

X Logo X Logo Followon X

Information

  • About
  • Account
  • Blog
  • Contact
  • Deals
  • List of VPS Hosting that Provides Open Port 25
  • Login
  • Newsletter
  • Privacy Policy
  • Terms of Service
  • Thank You
  • Verify Account

Resources

  • Account
  • Deals
  • Downloads
  • List of VPS Hosting that Provides Open Port 25
  • Login
  • Services
  • Thank You
  • Verify Account

Categories

  • Chat & Collaboration
  • Domain
  • Email Marketing
  • Email Service
  • Graphic Design
  • Hosting
  • Learning Management System
  • Linux
  • Miscellaneous
  • Proxy
  • Search Engine Optimization
  • SMS
  • SMTP server
  • WooCommerce
  • Wordpress
  • WP Security

Archive

  • November 2025
  • July 2023
  • June 2023
  • May 2023
  • January 2023
  • November 2022
  • September 2022
  • August 2022
  • July 2022
  • June 2022
  • May 2022
  • September 2021
  • June 2021
  • May 2021
  • April 2021
  • March 2021
  • February 2021
© Copyright - inGuide | Digital Marketing, Online Business & WordPress
  • Terms of Service
  • Privacy Policy
Link to: Super Easy Way to Generate and Validate DKIM online Link to: Super Easy Way to Generate and Validate DKIM online Super Easy Way to Generate and Validate DKIM onlinedomain-keys-identified-mail Link to: How to create SMTP with Mailinabox and send unlimited emails Link to: How to create SMTP with Mailinabox and send unlimited emails mailinabox-installation-ubuntuhttps://storyset.com/marketingHow to create SMTP with Mailinabox and send unlimited emails
Scroll to top Scroll to top Scroll to top