Install Docker and Docker-Compose on Ubuntu
If you are reading this article it means you might have heard a lot about docker. Or, just in case you haven’t heard about docker, let’s understand it from the very beginning. So, coming to the very first question that would pops up in any mind, what is docker? What does it do and why should we use it?
Before we find out what it is, let’s see this one first.
What is a container?
According to information from the docker home page, the container defines the following:
A container is a standard unit of software that packages up code and all its dependencies so the application runs quickly and reliably from one computing environment to another.
With the above definition, you’re still wondering what the container does.
The software companies race on technology, software development lifecycle needs to be done continuously and quickly. So the container came into being.
Imagine that, every time you start writing software, you need to install dependent packages to work, from OS, web server, php version, MariaDB, and so on.
Therefore, to answer this problem container came into existence. You can pack all those things into one file. Later, you just need to run the file and you have the environment ready as you want.
What is Docker?
Now, you understand that the container will help you to have a software development environment quickly and not conflict with the rest of the server.
But, how to get containers or perhaps how to create containers? How can we work with containers and manage containers?
The answer to all the above questions is Docker.
Simply understand, Docker is a platform (both commercial and free) that provides services and tools, allowing you to create packages and run your programs on different environments as quickly as possible. In other words, Docker is the platform that lets you create, manage, modify, deploy, and work with containers.
What are the Benefits of Docker?
1. Simulate the server environment at the local machine
Imagine a situation when you program the software on the local machine very well, but when it was uploaded to the server, it didn’t work. Why? Because the environment on both sides is not the same.
For example, let’s say your machine runs Python 3.5 but the CentOS server runs Python 2.7, so your code fails because of differences in version.
Therefore, you can use Docker to help you simulate the server environment perfectly without changing anything on your local machine.
2. Store and share the project environment settings for the team
Each project can have many people, requiring environmental settings to be meticulously documented, so that everyone can understand.
With Docker, you only need to share the environment image file with the whole team, so make sure the environment is the same between the members.
3. Software testing at the same time
To test the software, many people and many machines are needed at times. If you use a single machine, it will take a long time.
Now you can create multiple identical containers from the same original image file. Each container will let it perform a test task.
4. Test software on other operating systems
Traditionally, you will have to create different virtual machines and install operating systems on it. This takes a lot of time and resources.
With Docker, you just need to create other containers from different OS images. So you’ve got environments with different operating systems already, on the same local machine, and even extremely fast.
5. Avoid conflicts and reuse resources
With a traditional virtual machine, if you install the dependencies fail, you may have to recreate the virtual machine.
Or if you have set up a virtual machine environment to run PHP, now you want to setup a virtual machine to be able to run Django simultaneously. This may conflict with the environment on the virtual machine.
Docker solves that problem easily. By creating different, independent environmental containers.
It will guarantee 2 things:
- First, the containers do not conflict or damage anything on the host machine.
- Second, the containers are independent, do not conflict with each other. The Django runtime environment will not affect the PHP runtime environment and vice versa.
Besides, the reuse of resources. Traditional virtual machine models are very resource-intensive. With Docker and containers, you can create containers in minutes and it takes very little resources.
When you’re done using that container, you just need to use Docker to delete it. Host resources are quickly recovered.
How to install Docker?
Docker is mainly used on Linux computers, including servers and personal computers. Developers can install Docker on their computers and create perfect dev environments.
Add Docker GPG key to Linux Mint
First of all, switch to user root to execute commands or use sudo.
Update the package.
sudo apt-get update -y
After that, you need to set up the Docker repository. Therefore, you have to install a few packages.
sudo apt-get install ca-certificates curl gnupg -y
Next, add Docker’s official GPG key.
sudo install -m 0755 -d /etc/apt/keyrings
curl -fsSL https://download.docker.com/linux/ubuntu/gpg | sudo gpg --dearmor -o /etc/apt/keyrings/docker.gpg
sudo chmod a+r /etc/apt/keyrings/docker.gpg
Check your distribution name (optional)
You know, the Linux Mint or Ubuntu versions have their names, in order to be able to add the exact repository for your OS version, you need to specify the name first.
You type the command below.
root@mail:~# lsb_release -cs
focal
For example, my server is using the focal version, your computer may be a xenial example.
Add repository and install Docker in Ubuntu
Now, type the following command to add a repository to your computer.
echo \
  "deb [arch=$(dpkg --print-architecture) signed-by=/etc/apt/keyrings/docker.gpg] https://download.docker.com/linux/ubuntu \
  $(. /etc/os-release && echo "$VERSION_CODENAME") stable" | \
  sudo tee /etc/apt/sources.list.d/docker.list > /dev/null
Then, you have to update the software packages.
sudo apt-get update -y
Finally, run the following command to install Docker Engine and contanierd.
sudo apt-get install docker-ce docker-ce-cli containerd.io docker-buildx-plugin docker-compose-plugin
You can verify whether Docker CE is installed correctly by creating a container with the hello-world image.
sudo docker run hello-world

latest: Pulling from library/hello-world
b8dfde127a29: Pull complete
Digest: sha256:f2266cbfc127c960fd30e76b7c792dc23b588c0db76233517e1891a4e357d519
Status: Downloaded newer image for hello-world:latest

Hello from Docker!
This message shows that your installation appears to be working correctly.

To generate this message, Docker took the following steps:
 1. The Docker client contacted the Docker daemon.
 2. The Docker daemon pulled the "hello-world" image from the Docker Hub.
    (amd64)
 3. The Docker daemon created a new container from that image which runs the
    executable that produces the output you are currently reading.
 4. The Docker daemon streamed that output to the Docker client, which sent it
    to your terminal.

To try something more ambitious, you can run an Ubuntu container with:
 $ docker run -it ubuntu bash

Share images, automate workflows, and more with a free Docker ID:
 https://hub.docker.com/

For more examples and ideas, visit:
 https://docs.docker.com/get-started/
So, now you have successfully installed Docker Engine on your computer, you can try to create some simple containers to experience Docker.
How to Install Docker-Compose?
Now many times, you will also need to install Docker-compose back to back with the docker engine. So, let’s begin.
First of all download the current stable release of Docker Compose:
curl -SL https://github.com/docker/compose/releases/download/v2.23.3/docker-compose-linux-x86_64 -o /usr/local/bin/docker-compose

 % Total    % Received % Xferd  Average Speed   Time    Time     Time  Current
                                 Dload  Upload   Total   Spent    Left  Speed
100   633  100   633    0     0  15439      0 --:--:-- --:--:-- --:--:-- 15439
100 12.1M  100 12.1M    0     0  37.0M      0 --:--:-- --:--:-- --:--:-- 50.1M
To install another version of compose replace 2.23.3 with the version of compose you want.
Next, update the permission to binary
sudo chmod +x /usr/local/bin/docker-compose
Finally, test the installation
docker-compose --version
Now, that you have successfully installed both the docker engine and compose, you might want to install some container.
Just in case if above command fails to give you output
sudo ln -s /usr/local/bin/docker-compose /usr/bin/docker-compose
Search for a container image
This article will show you how to search for a container image. Thereby you will get the image you need to launch the container.
Docker Hub
First, I have to talk about Docker Hub. This is a huge Docker library, it contains image containers here and allows you to download.
Temporarily, we’re not going to talk about how to create and upload images to Docker Hub, but we just stop to figure out how to find an image we need to use.
Search directly on the Docker Hub website
Go directly to the website and search for the image. For example, I need a CentOS image, I will type centos in the search box on the website.
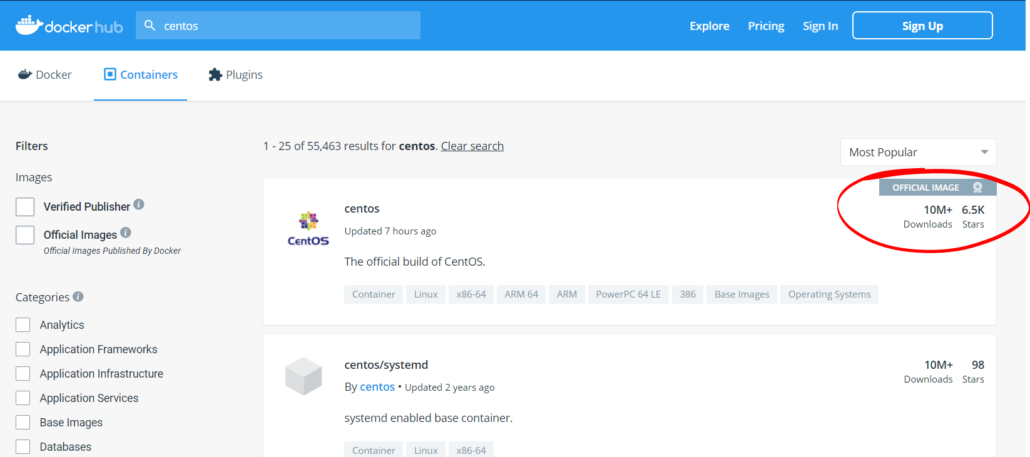
As a result, notice that the images are labeled OFFICIAL IMAGE. These are genuine images for all users. You should use it because it ensures clean images, does not contain underground viruses.
Here, I click on the first result, centos official image. Next, I need to select the tag. You can understand the tag here is the different versions of the image that the provider creates. For example centos 7, centos 8, … if you don’t know the version, you can choose the latest.
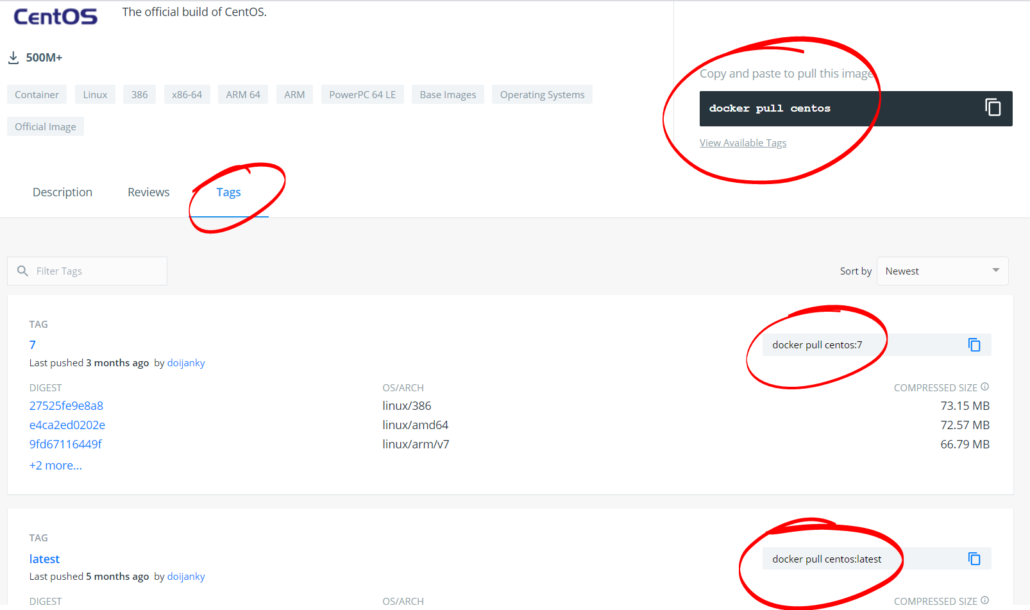
For example, here I will choose CentOS. And now, look to the right of the screen, you will see the following command:
docker pull centos
This is the command to download the image to your computer or server. Now, if you want to download to CentOS 7, include the selected tag.
docker pull centos:7
Search through the docker command
There is another way you can find the images you need, no need to visit the website. That is to use the docker command.
Docker has a search command that allows you to search for images directly from Docker Hub.
Type the search image centos command as follows.
docker search centos
And the result will show up as follows.
NAME                               DESCRIPTION                                     STARS     OFFICIAL   AUTOMATED
centos                             The official build of CentOS.                   6541      [OK]
ansible/centos7-ansible            Ansible on Centos7                              134                  [OK]
consol/centos-xfce-vnc             Centos container with "headless" VNC session…   128                  [OK]
jdeathe/centos-ssh                 OpenSSH / Supervisor / EPEL/IUS/SCL Repos - …   118                  [OK]
centos/systemd                     systemd enabled base container.                 98                   [OK]
centos/mysql-57-centos7            MySQL 5.7 SQL database server                   87
imagine10255/centos6-lnmp-php56    centos6-lnmp-php56                              58                   [OK]
tutum/centos                       Simple CentOS docker image with SSH access      48
kinogmt/centos-ssh                 CentOS with SSH                                 29                   [OK]
pivotaldata/centos-gpdb-dev        CentOS image for GPDB development. Tag names…   13
guyton/centos6                     From official centos6 container with full up…   10                   [OK]
drecom/centos-ruby                 centos ruby                                     6                    [OK]
pivotaldata/centos                 Base centos, freshened up a little with a Do…   5
darksheer/centos                   Base Centos Image -- Updated hourly             3                    [OK]
pivotaldata/centos-mingw           Using the mingw toolchain to cross-compile t…   3
pivotaldata/centos-gcc-toolchain   CentOS with a toolchain, but unaffiliated wi…   3
mamohr/centos-java                 Oracle Java 8 Docker image based on Centos 7    3                    [OK]
miko2u/centos6                     CentOS6 日本語環境                                   2                    [OK]
amd64/centos                       The official build of CentOS.                   2
indigo/centos-maven                Vanilla CentOS 7 with Oracle Java Developmen…   2                    [OK]
pivotaldata/centos6.8-dev          CentosOS 6.8 image for GPDB development         1
mcnaughton/centos-base             centos base image                               1                    [OK]
blacklabelops/centos               CentOS Base Image! Built and Updates Daily!     1                    [OK]
pivotaldata/centos7-dev            CentosOS 7 image for GPDB development           0
smartentry/centos                  centos with smartentry                          0                    [OK]
Now, you can also use the pull command to download the image you need to your computer.
$ docker pull centos:7
7.6.1810: Pulling from library/centos
ac9208207ada: Pull complete
Digest: sha256:6ae4cddb2b37f889afd576a17a5286b311dcbf10a904409670827f6f9b50065e
Status: Downloaded newer image for centos:7.6.1810
Check the downloaded image
Now you can check the images that you downloaded to the computer using the command below.
$ docker image list
REPOSITORY          TAG                 IMAGE ID            CREATED             SIZE
centos              7.6.1810            f1cb7c7d58b7        6 weeks ago         202MB
centos              7                   9f38484d220f        6 weeks ago         202MB
ubuntu              16.04               7e87e2b3bf7a        3 months ago        117MB
So, that’s how you download images from docker.
Conclusion
In this article, there is no difficult technique. It is simply a tutorial that shows you how to find the image container you need. This is the first step you need to learn, you can’t create the necessary containers if you don’t know how to find the image.

You’re a life saver.
Thanks for the guide